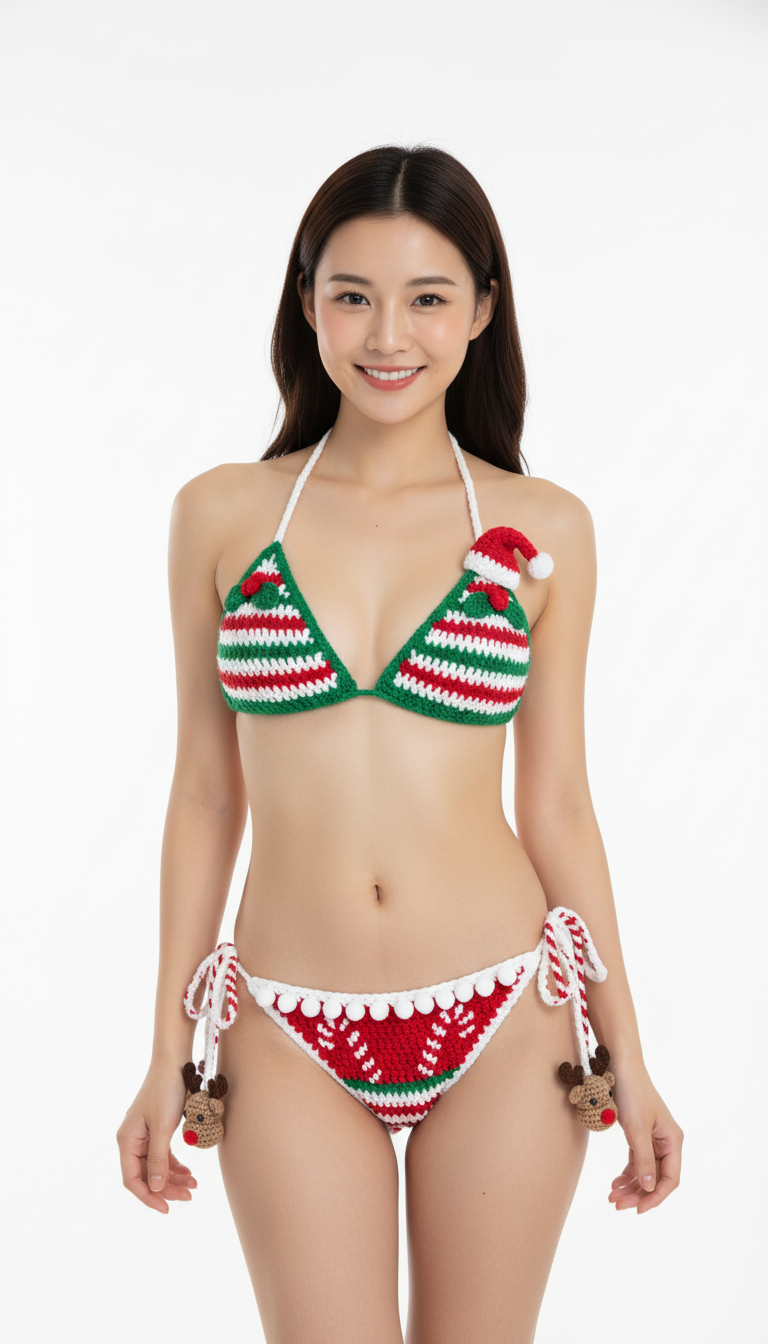
Get ready to spread some serious holiday cheer with this unique crochet Christmas bikini pattern! Perfect for a festive photoshoot, a winter getaway to a warmer climate, or even just lounging by the pool with a touch of seasonal spirit. This pattern combines classic bikini styling with adorable festive details, ensuring you’ll stand out.
Unwrap the Joy of Handmade Festive Fashion
There’s nothing quite like the satisfaction of creating your own wardrobe, especially when it’s as fun and unique as this holiday-themed bikini. Showcase your crochet skills and your love for the festive season all at once. This project is a fantastic way to bring personality and a handmade touch to your swimwear collection, making it truly special.
Crochet Pattern: Jolly Holiday Crochet Bikini Pattern: Craft Your Festive Swimwear!
Materials
- DK weight cotton yarn in Red
- DK weight cotton yarn in Green
- DK weight cotton yarn in White
- DK weight cotton yarn in Light Brown (for reindeer)
- DK weight cotton yarn in Dark Brown (for reindeer antlers)
- Crochet hook 3.0mm
- Tapestry needle
- Scissors
- Stitch markers
- Fiberfill stuffing
Abbreviations
- ch: chain
- sl st: slip stitch
- sc: single crochet
- hdc: half double crochet
- dc: double crochet
- tr: treble crochet
- inc: increase (2 sc in one stitch)
- dec: decrease (sc2tog)
- MR: magic ring
- FO: finish off
- st(s): stitch(es)
- rep: repeat
- sk: skip
- Bbl: Bobble stitch (Yo, insert hook into st, yo, pull up a loop, yo, pull through 2 loops. Rep 3 more times in the same st (5 loops on hook). Yo, pull through all 5 loops.)
Instructions
Gauge: 20 hdc x 16 rows = 4 inches (10 cm) in hdc. Adjust hook size as needed to obtain gauge.
Note: This pattern is for a generalized size. Adjust starting chains and row counts for desired fit.
Bikini Top (Make 2 Cups)
Cup Construction: Work in rows, increasing at the center and edges to form a triangle.
- Using Green yarn, ch 4.
- Row 1: Hdc in 2nd ch from hook, hdc in next st, (hdc, ch 1, hdc) in last ch. Turn. (3 hdc, 1 ch-1 space)
- Row 2: Ch 1, 2 hdc in first st, hdc in next st, (hdc, ch 1, hdc) in ch-1 space, hdc in next st, 2 hdc in last st. Turn. (7 hdc, 1 ch-1 space)
- Row 3: Ch 1, 2 hdc in first st, hdc in each st until ch-1 space, (hdc, ch 1, hdc) in ch-1 space, hdc in each st until last st, 2 hdc in last st. Turn.
- Repeat Row 3, changing colors every 2 rows: *2 rows Green, 2 rows White, 2 rows Red*. Continue this sequence until the cup reaches your desired size. FO.
Edging & Ties
- Join White yarn with a sl st to any corner of a cup. Sc evenly around the entire cup. Sl st to join.
- Halter Tie (Make 2): Attach White yarn to the top corner of each cup. Ch 100-150 (or desired length). FO.
- Bottom Tie: Attach White yarn to the bottom center of the cup. Ch 50-70 (or desired length). FO. (This ties to the other cup’s bottom tie)
Santa Hat Embellishment (for one cup)
- Using Red yarn, MR. 6 sc in MR. (6)
- Rnd 1: Sc in each st around. (6)
- Rnd 2: *Sc in next st, inc* rep 3 times. (9)
- Rnd 3: Sc in each st around. (9)
- Rnd 4: *Sc in next 2 sts, inc* rep 3 times. (12)
- Rnd 5: Sc in each st around. (12)
- Stuff lightly.
- Using White yarn, ch 10. FO. Attach around the base of the hat as trim.
- Make a small white pompom and sew to the tip of the hat.
- Sew hat securely onto the top edge of one bikini cup.
Bow Embellishment (for the other cup)
- Using Red yarn, ch 10.
- Row 1: Sc in 2nd ch from hook and across. (9)
- Rows 2-4: Ch 1, sc across. (9) FO.
- Pinch the center of the rectangle and wrap a small piece of red yarn around it several times to create a bow shape. Secure.
- Sew bow securely onto the top edge of the second bikini cup.
Bikini Bottom
Front Panel:
- Using Red yarn, ch 25 (or desired width for front).
- Row 1: Hdc in 2nd ch from hook and across. Turn. (24 hdc)
- Rows 2-5: Ch 1, hdc across. Turn. (24 hdc)
- Shaping (Decrease Rows): Ch 1, hdc2tog, hdc in each st until last 2 sts, hdc2tog. Turn.
- Repeat decrease row until 10 sts remain (or desired width for gusset).
- Work 5-7 rows of sc without decreases for gusset. FO.
Back Panel:
- Using Red yarn, ch 25 (or desired width for back).
- Row 1: Hdc in 2nd ch from hook and across. Turn. (24 hdc)
- Rows 2-10: Ch 1, hdc across. Turn. (24 hdc)
- Shaping (Increase Rows): Ch 1, 2 hdc in first st, hdc in each st until last st, 2 hdc in last st. Turn.
- Repeat increase row until desired width for hips. Work several more rows straight for length. FO.
Assembly of Bottoms
- Sew the gusset end of the front panel to the gusset end of the back panel using Red yarn.
- Sc evenly around all edges of the bottom with Red yarn, creating a clean finish.
Bobble Trim
- Join White yarn to the top edge of the front panel.
- Ch 1, *sc in next st, Bbl in next st* rep across. End with a sc. FO.
Snowflake Embroidery
- Using White yarn and a tapestry needle, embroider small snowflake or starburst patterns randomly across the red front panel of the bikini bottom, as seen in the image.
Side Ties (Make 2)
- Using White yarn, ch 100-150 (or desired length).
- Stripe detail: Every 5 chains, switch to Red yarn, then back to White, creating a candy-cane stripe effect. FO.
- Attach one tie to each side of the front panel and the corresponding side of the back panel.
Reindeer Amigurumi (Make 2)
Head:
- Using Light Brown yarn, MR. 6 sc in MR. (6)
- Rnd 1: Inc in each st around. (12)
- Rnd 2: *Sc in next st, inc* rep 6 times. (18)
- Rnd 3-5: Sc in each st around. (18)
- Stuff lightly. FO, leaving a long tail for sewing.
Nose:
- Using Red yarn, MR. 4 sc in MR. Pull tight. FO. Sew onto the front of the head.
Antlers (Make 4 – 2 per reindeer):
- Using Dark Brown yarn, ch 5. Sl st in 2nd ch from hook, sc in next 2 ch, sl st in last ch. FO, leaving a tail.
- Sew two antlers to the top of each reindeer head.
- Using Black embroidery floss (or thin black yarn), embroider small eyes on the head.
Finishing Touches
- Attach one completed reindeer head securely to the end of each side tie on the bikini bottom.
- Weave in all remaining ends.
Enjoy your festive new bikini!