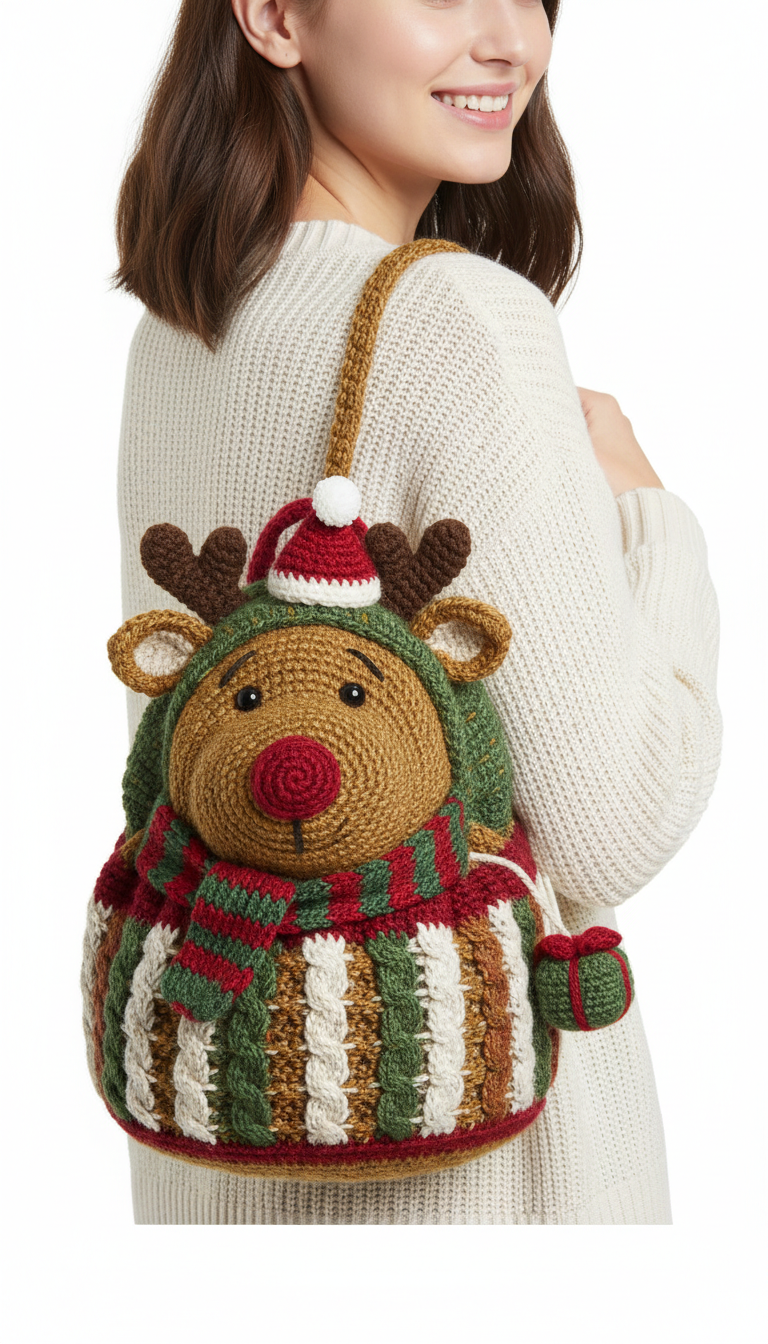
Get ready to spread some holiday cheer with this adorable Jolly Reindeer Crochet Backpack! Perfect for gifting or carrying your essentials, this festive amigurumi-style bag features a charming reindeer face, a tiny Santa hat, and a cozy striped scarf. This pattern is designed to bring a smile to anyone’s face, making it a unique and delightful addition to your winter wardrobe.
Craft Your Own Holiday Companion
Imagine the joy of carrying your very own handcrafted reindeer backpack, or surprising a loved one with this thoughtful, custom-made gift. This pattern guides you through creating intricate details, from the reindeer’s cheerful expression to the unique textured stripes of the bag body, ensuring a truly special and personalized accessory for the festive season.
Crochet Pattern: Jolly Reindeer Crochet Backpack: A Festive Amigurumi Carry-All Pattern
Materials
- Worsted weight yarn in: Light Brown (Yarn A), Dark Brown (Yarn B), Red (Yarn C), Cream (Yarn D), Dark Green (Yarn E), Light Green (Yarn F), Medium Brown (Yarn G), Burgundy (Yarn H)
- 4.0mm crochet hook (or size needed to obtain gauge)
- 9mm safety eyes
- Polyester fiberfill for stuffing
- Stitch markers
- Tapestry needle
- Scissors
Abbreviations
- MR: Magic Ring
- ch: chain
- sl st: slip stitch
- sc: single crochet
- hdc: half double crochet
- dc: double crochet
- fpdc: front post double crochet
- inc: increase (2 sc in one stitch)
- dec: decrease (sc 2 together)
- FO: Fasten off
- BLO: back loop only
- Rnd: Round
- St(s): Stitch(es)
Instructions
Gauge: 4 sc and 4 rows = 1 inch (2.5 cm) for amigurumi parts, 3 hdc and 2 rows = 1 inch for bag body (adjust hook size if necessary).
Reindeer Head (Yarn A – Light Brown)
- Rnd 1: Start with MR, 6 sc in MR. (6)
- Rnd 2: Inc in each st around. (12)
- Rnd 3: (Sc, inc) x 6. (18)
- Rnd 4: (Sc in 2, inc) x 6. (24)
- Rnd 5: (Sc in 3, inc) x 6. (30)
- Rnd 6: (Sc in 4, inc) x 6. (36)
- Rnd 7: (Sc in 5, inc) x 6. (42)
- Rnd 8-15: Sc in each st around. (42)
- Insert safety eyes between Rnd 11 and 12, about 7-8 sts apart.
- Rnd 16: (Sc in 5, dec) x 6. (36)
- Rnd 17: (Sc in 4, dec) x 6. (30)
- Start stuffing firmly.
- Rnd 18: (Sc in 3, dec) x 6. (24)
- Rnd 19: (Sc in 2, dec) x 6. (18)
- Rnd 20: (Sc, dec) x 6. (12)
- Rnd 21: Dec x 6. (6)
- FO, leave long tail for sewing. Finish stuffing and close hole.
Nose (Yarn C – Red)
- Rnd 1: Start with MR, 6 sc in MR. (6)
- Rnd 2: Inc in each st around. (12)
- Rnd 3: Sc in each st around. (12)
- Rnd 4: Dec x 6. (6)
- FO, leave long tail for sewing. Stuff lightly and sew onto the center of the head below the eyes.
Ears (Make 2 – Yarn A, then Yarn D)
- Using Yarn A: Ch 7.
- Row 1: Sc in 2nd ch from hook, sc in next 4 ch, 3 sc in last ch. Working along other side of ch, sc in 5 ch. (13)
- Row 2: Inc, sc in 4, inc x 3, sc in 4, inc. (18)
- Sl st to first sc, FO.
- Using Yarn D, repeat Rows 1-2.
- Sew the Cream ear piece onto the Light Brown ear piece. Pinch bottom edges and sew to sides of head.
Antlers (Make 2 – Yarn B – Dark Brown)
- Small branch: Ch 5. Sc in 2nd ch from hook, sc in next 3. FO, leave tail.
- Large branch: Ch 7. Sc in 2nd ch from hook, sc in next 5. FO, leave tail.
- Join small branch to large branch about 2/3 way up the large branch to form a ‘Y’ shape. Sew securely to top of head.
Santa Hat (Yarn C – Red, Yarn D – Cream)
- Hat Cone (Yarn C):
- Rnd 1: Start with MR, 6 sc in MR. (6)
- Rnd 2-3: Sc in each st around. (6)
- Rnd 4: (Sc in 2, inc) x 2. (8)
- Rnd 5: Sc in each st around. (8)
- Rnd 6: (Sc in 3, inc) x 2. (10)
- Rnd 7: Sc in each st around. (10)
- Rnd 8: (Sc in 4, inc) x 2. (12)
- Rnd 9: Sc in each st around. (12)
- Rnd 10: (Sc in 5, inc) x 2. (14)
- Rnd 11: Sc in each st around. (14)
- Rnd 12: (Sc in 6, inc) x 2. (16)
- Rnd 13: Sc in each st around. (16)
- Rnd 14: (Sc in 7, inc) x 2. (18)
- Sl st to join. FO.
- Brim (Yarn D):
- Ch 19, sl st to join to form a circle (be careful not to twist).
- Rnd 1: Sc in each st around. (18)
- Sl st to join, FO.
- Sew brim to the bottom of the red cone. Make a small pom-pom with Yarn D and sew to the top of the hat. Sew hat onto the reindeer head.
Reindeer Scarf (Yarn C – Red, Yarn E – Dark Green, Yarn F – Light Green)
- Using Yarn C, ch 60 (or desired length).
- Row 1: Hdc in 3rd ch from hook and in each ch across. (58)
- Row 2: Ch 2 (counts as hdc), turn. Hdc in each st across. (58)
- Change to Yarn E.
- Row 3-4: Repeat Row 2.
- Change to Yarn F.
- Row 5-6: Repeat Row 2.
- Repeat the color sequence (C, E, F) two more times for a total of 6 stripes. FO. Wrap around the reindeer’s neck and sew securely.
Bag Body
Base (Yarn H – Burgundy)
- Ch 21.
- Rnd 1: Sc in 2nd ch from hook, sc in next 18 ch, 3 sc in last ch. Working along other side of ch: sc in next 18 ch, 2 sc in last ch. (42)
- Rnd 2: Inc, sc in 18, inc x 3, sc in 18, inc x 2. (48)
- Rnd 3: Sc, inc, sc in 18, (sc, inc) x 3, sc in 18, (sc, inc) x 2. (54)
- Rnd 4: Sc in 2, inc, sc in 18, (sc in 2, inc) x 3, sc in 18, (sc in 2, inc) x 2. (60)
- Rnd 5: Sc in 3, inc, sc in 18, (sc in 3, inc) x 3, sc in 18, (sc in 3, inc) x 2. (66)
- Rnd 6: Sc in 4, inc, sc in 18, (sc in 4, inc) x 3, sc in 18, (sc in 4, inc) x 2. (72)
- Sl st to join, ch 1.
- Rnd 7: Sc in BLO around. (72) (This creates a defined edge for the bag sides)
Sides (working in continuous rounds, change colors as indicated)
The textured pattern involves alternating rounds of HDC with rounds that feature FPDC. Each color stripe will be 4 rounds high.
- Yarn H (Burgundy – Base Trim):
- Rnd 8-9: Hdc in each st around. (72)
- Change to Yarn D (Cream):
- Rnd 10: Hdc in each st around. (72)
- Rnd 11: (Fpdc around next st, hdc in next st) x 36. (72)
- Rnd 12-13: Hdc in each st around. (72)
- Change to Yarn E (Dark Green):
- Rnd 14: Hdc in each st around. (72)
- Rnd 15: (Hdc in next st, fpdc around next st) x 36. (72)
- Rnd 16-17: Hdc in each st around. (72)
- Change to Yarn G (Medium Brown):
- Rnd 18: Hdc in each st around. (72)
- Rnd 19: (Fpdc around next st, hdc in next st) x 36. (72)
- Rnd 20-21: Hdc in each st around. (72)
- Change to Yarn D (Cream):
- Rnd 22: Hdc in each st around. (72)
- Rnd 23: (Hdc in next st, fpdc around next st) x 36. (72)
- Rnd 24-25: Hdc in each st around. (72)
- Change to Yarn E (Dark Green):
- Rnd 26: Hdc in each st around. (72)
- Rnd 27: (Fpdc around next st, hdc in next st) x 36. (72)
- Rnd 28-29: Hdc in each st around. (72)
- Change to Yarn C (Red – Top Trim):
- Rnd 30-32: Hdc in each st around. (72)
- Sl st to join. FO.
Drawstring Channel (Yarn C – Red)
- Attach Yarn C to top edge of bag.
- Rnd 1: Ch 2 (counts as hdc), skip 1 st, (hdc in next st, ch 1, skip 1 st) around. Sl st to top of beg ch-2. (36 hdc, 36 ch-1 spaces)
- Rnd 2: Ch 1, sc in each hdc and ch-1 space around. Sl st to first sc. (72)
- FO.
Bag Strap (Yarn G – Medium Brown)
- Ch 81 (or desired length for strap).
- Row 1: Hdc in 3rd ch from hook and in each ch across. (79)
- Row 2-3: Ch 2 (counts as hdc), turn. Hdc in each st across. (79)
- FO, leaving long tails for sewing.
Drawstring (Yarn D – Cream)
- Ch 150 (or desired length). Weave through the ch-1 spaces of the drawstring channel.
Mini Gift Charm (Yarn E – Dark Green, Yarn C – Red)
- Using Yarn E:
- Rnd 1: Start with MR, 6 sc in MR. (6)
- Rnd 2: Inc in each st around. (12)
- Rnd 3: Sc in each st around. (12)
- Rnd 4: (Sc in 2, inc) x 4. (16)
- Rnd 5-6: Sc in each st around. (16)
- Rnd 7: (Sc in 2, dec) x 4. (12)
- Stuff lightly.
- Rnd 8: Dec x 6. (6)
- FO. Form a small bow with Yarn C and sew to the top. Attach to one end of the drawstring.
Assembly
- Sew the reindeer head securely to the front of the red top trim of the bag. The bottom of the head should sit just above the red stripe.
- Sew the ends of the strap securely to the back of the bag, making sure it is centered.
- Weave the Cream drawstring through the drawstring channel, ensuring the gift charm is at one end. Tie a knot in the ends of the drawstring to prevent it from pulling through.
- Embroider a small smile on the reindeer face using Yarn B or D.