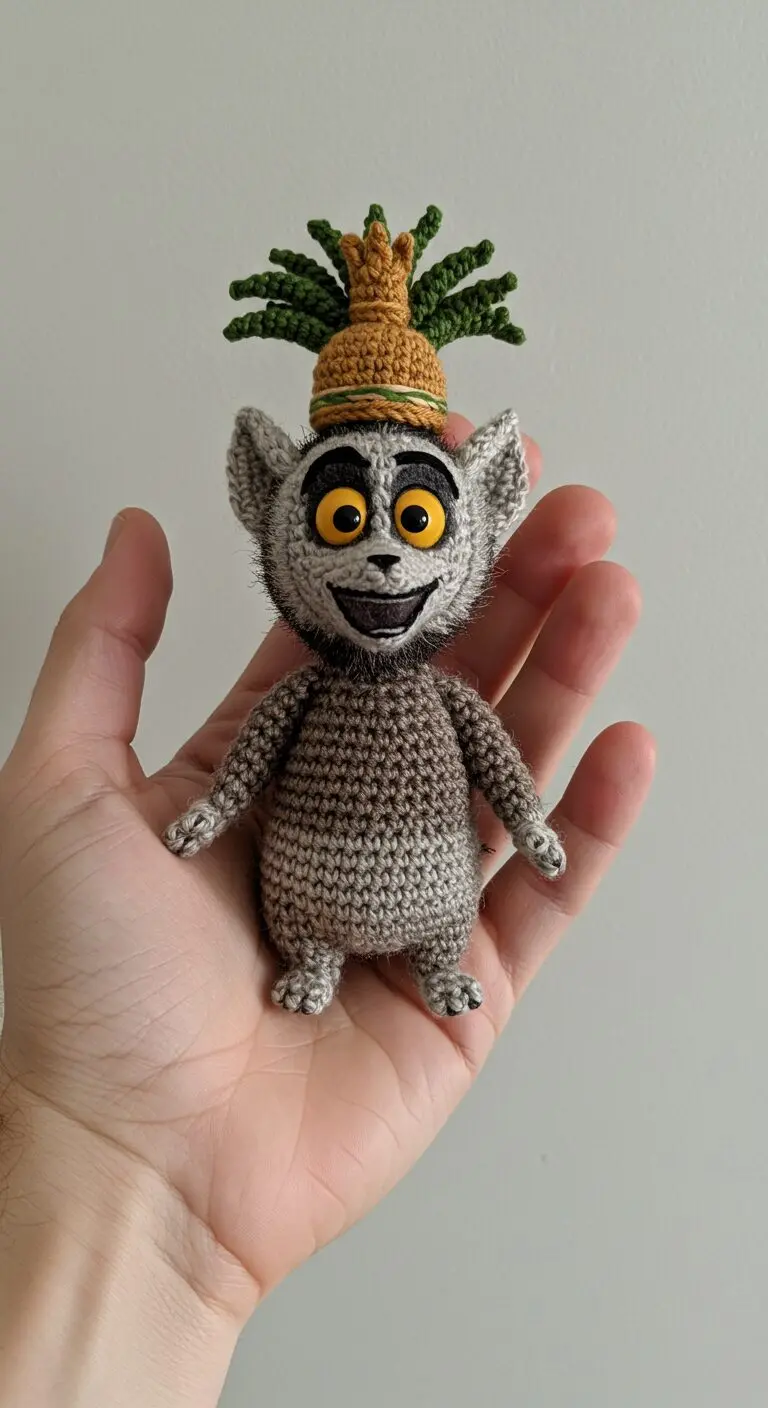
King Julien amigurumi crochet is a hilarious and royal piece, complete with his iconic pineapple crown.
Crocheted with wide eyes and wild expression, this King Julien figure is perfect for fans of Madagascar and lovers of quirky handmade toys.
Skill Level: Intermediate
Finished Size: Approximately [To be determined after drafting, based on hook/yarn size] tall (excluding crown).
Materials
•Yarn:
•Light Grey (for head, ears, and muzzle)
•Brown/Beige (for body and limbs – main color)
•Dark Brown/Grey (for body stripes and limb details)
•Yellow/Orange (for eye irises and pineapple crown base)
•Black (for eye pupils, eye outline, nose, mouth, and fur details)
•White (for eye highlights)
•Dark Green (for pineapple crown leaves)
•Crochet Hook: Size appropriate for your chosen yarn (e.g., 2.0mm – 3.0mm) to ensure tight stitches.
•Stuffing: Polyester fiberfill
•Tapestry Needle: For sewing parts and weaving in ends.
•Stitch Markers: Essential for working in continuous rounds.
•Scissors
•Pins: For positioning parts before sewing.
•Wire Brush (optional): For creating a brushed fur effect.
Abbreviations (US Crochet Terms)
•MR: Magic Ring
•ch: Chain
•sl st: Slip Stitch
•sc: Single Crochet
•inc: Increase (2 sc in one stitch)
•dec: Decrease (sc2tog – single crochet 2 together)
•FLO: Front Loop Only
•BLO: Back Loop Only
•FO: Fasten Off
•st(s): Stitch(es)
•(…): Repeat instructions within parentheses the specified number of times.
•[…]: Total number of stitches at the end of the round/row.
Notes
•Work in continuous rounds unless otherwise specified. Do not join rounds with a slip stitch unless instructed.
•Use a stitch marker to mark the first stitch of each round.
•Stuff your amigurumi firmly as you go, ensuring an even and smooth shape.
•The finished size may vary depending on your yarn weight and hook size.
•For a cleaner finish, use the invisible decrease method (insert hook into front loop of first stitch, then into front loop of second stitch, yarn over, pull through both loops, yarn over, pull through remaining two loops).
Pattern
Head (Light Grey Yarn)
King Julien’s head is a prominent feature, so it will be worked in continuous rounds to create a smooth, rounded shape. Stuff firmly as you go.
Round 1: MR 6 sc [6] Round 2: (inc) x 6 [12] Round 3: (sc, inc) x 6 [18] Round 4: (2 sc, inc) x 6 [24] Round 5: (3 sc, inc) x 6 [30] Round 6: (4 sc, inc) x 6 [36] Round 7: (5 sc, inc) x 6 [42] Round 8: (6 sc, inc) x 6 [48] Round 9: (7 sc, inc) x 6 [54] Round 10-18: Sc in each st around (9 rounds) [54]
At this point, consider placing safety eyes if using them. Based on the image, the eyes are large and set relatively wide apart. If embroidering, you will do this later.
Round 19: (7 sc, dec) x 6 [48] Round 20: (6 sc, dec) x 6 [42] Round 21: (5 sc, dec) x 6 [36] Round 22: (4 sc, dec) x 6 [30] Round 23: (3 sc, dec) x 6 [24] Round 24: (2 sc, dec) x 6 [18]
Start stuffing the head firmly, shaping it as you go.
Round 25: (sc, dec) x 6 [12] Round 26: (dec) x 6 [6]
FO, leaving a long tail for sewing. Weave the tail through the front loop of the remaining 6 stitches and pull tight to close the opening. Weave in the end.
Body (Start with Brown/Beige Yarn)
King Julien’s body has a distinctive pear shape and stripes. You will alternate between the main body color (Brown/Beige) and the darker stripe color (Dark Brown/Grey) to achieve this effect. Stuff firmly as you go.
Round 1: MR 6 sc [6] Round 2: (inc) x 6 [12] Round 3: (sc, inc) x 6 [18] Round 4: (2 sc, inc) x 6 [24] Round 5: (3 sc, inc) x 6 [30] Round 6: (4 sc, inc) x 6 [36] Round 7: (5 sc, inc) x 6 [42] Round 8: (6 sc, inc) x 6 [48] Round 9: (7 sc, inc) x 6 [54] Round 10-12: Sc in each st around (3 rounds) [54]
Round 13: Change to Dark Brown/Grey Yarn. Sc in each st around [54] Round 14: Change to Brown/Beige Yarn. Sc in each st around [54]
Round 15: (7 sc, dec) x 6 [48] Round 16: Sc in each st around [48]
Round 17: Change to Dark Brown/Grey Yarn. Sc in each st around [48] Round 18: Change to Brown/Beige Yarn. Sc in each st around [48]
Round 19: (6 sc, dec) x 6 [42] Round 20: Sc in each st around [42]
Round 21: Change to Dark Brown/Grey Yarn. Sc in each st around [42] Round 22: Change to Brown/Beige Yarn. Sc in each st around [42]
Round 23: (5 sc, dec) x 6 [36] Round 24: Sc in each st around [36]
Round 25: Change to Dark Brown/Grey Yarn. Sc in each st around [36] Round 26: Change to Brown/Beige Yarn. Sc in each st around [36]
Round 27: (4 sc, dec) x 6 [30] Round 28: Sc in each st around [30]
Round 29: Change to Dark Brown/Grey Yarn. Sc in each st around [30] Round 30: Change to Brown/Beige Yarn. Sc in each st around [30]
Round 31: (3 sc, dec) x 6 [24]
FO, leaving a long tail for sewing. Stuff the body firmly. Sew the body to the bottom of the head, ensuring it is centered and securely attached.
Arms (Make 2 – Start with Brown/Beige Yarn)
King Julien’s arms are relatively thin. Stuff lightly as you go, primarily at the end closest to the body.
Round 1: MR 6 sc [6] Round 2: (sc, inc) x 3 [9] Round 3-12: Sc in each st around (10 rounds) [9]
FO, leaving a long tail for sewing. Do not stuff the last few rounds to allow for easier flattening and sewing to the body.
Legs (Make 2 – Start with Brown/Beige Yarn)
King Julien’s legs are slightly thicker than his arms and have defined feet. Stuff firmly as you go.
Round 1: MR 6 sc [6] Round 2: (inc) x 6 [12] Round 3: (sc, inc) x 6 [18] Round 4-6: Sc in each st around (3 rounds) [18] Round 7: (sc, dec) x 6 [12] Round 8-12: Sc in each st around (5 rounds) [12]
FO, leaving a long tail for sewing. Stuff the legs firmly. Flatten the top opening and sew to the bottom of the body, positioning them to allow the body to sit upright.
Ears (Make 2 – Light Grey Yarn)
King Julien’s ears are triangular and prominent. Do not stuff.
Row 1: Ch 2, 2 sc in 2nd ch from hook [2] Row 2: Ch 1, turn, inc, sc [3] Row 3: Ch 1, turn, sc in each st across [3] Row 4: Ch 1, turn, inc, sc, inc [5] Row 5: Ch 1, turn, sc in each st across [5] Row 6: Ch 1, turn, inc, 3 sc, inc [7] Row 7: Ch 1, turn, sc in each st across [7]
FO, leaving a long tail for sewing. Pinch the bottom corners together and sew to the sides of the head, referring to the image for placement.
Tail (Brown/Beige and Dark Brown/Grey Yarn)
King Julien is known for his long, striped tail. This will be worked in continuous rounds, alternating colors to create the striped effect. Stuff lightly as you go.
Round 1: MR 6 sc [6] (Brown/Beige Yarn) Round 2-3: Sc in each st around (2 rounds) [6] (Brown/Beige Yarn)
Round 4-5: Change to Dark Brown/Grey Yarn. Sc in each st around (2 rounds) [6]
Round 6-7: Change to Brown/Beige Yarn. Sc in each st around (2 rounds) [6]
Repeat Rounds 4-7 until the tail reaches your desired length (approximately 8-10 stripes). End with a Brown/Beige stripe.
FO, leaving a long tail for sewing. Stuff lightly. Sew the tail to the back of the body, at the base.
Pineapple Crown (Yellow/Orange and Dark Green Yarn)
Crown Base (Yellow/Orange Yarn)
This part will form the main body of the pineapple. To create a subtle texture, we will work some rounds in the back loop only (BLO).
Round 1: MR 6 sc [6] Round 2: (inc) x 6 [12] Round 3: (sc, inc) x 6 [18] Round 4: (2 sc, inc) x 6 [24] Round 5: (3 sc, inc) x 6 [30] Round 6: Sc in each st around [30] Round 7: Sc in each st around in BLO [30] Round 8-10: Sc in each st around (3 rounds) [30] Round 11: Sc in each st around in BLO [30] Round 12: Sc in each st around [30]
FO, leaving a long tail for sewing. Lightly stuff the crown base.
Crown Leaves (Make 6-8 – Dark Green Yarn)
These leaves will give the crown its pineapple top. Do not stuff.
Row 1: Ch 5, sc in 2nd ch from hook, sc in next 3 ch [4] Row 2: Ch 1, turn, sc in each st across [4] Row 3: Ch 1, turn, dec, dec [2] Row 4: Ch 1, turn, dec [1]
FO, leaving a long tail for sewing. Sew these leaves evenly around the top opening of the crown base.
Assembly
1.Attach Head to Body: Using the long tail from the head, sew the head securely to the top of the body. Ensure it is centered and sits upright.
2.Attach Arms: Pin the arms to the sides of the body, just below the neck, ensuring they are symmetrical. Sew them securely in place.
3.Attach Legs: Pin the legs to the bottom of the body, ensuring they are evenly spaced and allow the amigurumi to stand or sit as desired. Sew them securely.
4.Attach Ears: Pin the ears to the sides of the head, slightly above the eye line, referring to the reference image for accurate placement. Sew them securely.
5.Attach Tail: Sew the tail to the back of the body, at the base, ensuring it is securely attached.
6.Attach Pineapple Crown: Sew the completed pineapple crown to the top of King Julien’s head, centering it carefully.
Facial Features and Details
King Julien’s expressive face is key to his character. These details are best embroidered after the head is attached to the body.
1.Muzzle (Light Grey Yarn):
•Using Light Grey yarn, embroider a small oval shape for the muzzle area on the front of the head, centered below where the eyes will be. This can be done with satin stitch or by making several horizontal stitches to fill the area.
2.Nose (Black Yarn):
•Using Black yarn, embroider a small triangular or oval nose at the top center of the muzzle. Refer to the image for size and placement.
3.Mouth (Black and Dark Brown/Grey Yarn):
•Using Black yarn, embroider a wide, smiling mouth line. Start from one side of the muzzle, curve downwards slightly, and then upwards to the other side. You can use a backstitch for a clean line.
•For the inside of the mouth, use Dark Brown/Grey yarn to fill in the area below the black mouth line, creating the impression of an open mouth.
4.Eyes (Yellow/Orange, Black, and White Yarn):
•Placement: Pin the approximate locations for the eyes. King Julien has large, expressive eyes. They should be placed relatively wide apart, above the muzzle.
•Yellow/Orange Iris: Using Yellow/Orange yarn, embroider a large circle for the iris. This can be done with satin stitch, filling in the circle completely. Ensure both irises are the same size and shape.
•Black Pupil: Using Black yarn, embroider a smaller circle or oval in the center of the yellow/orange iris for the pupil. Make sure it’s proportional to the iris.
•White Highlight: Using White yarn, embroider a small dot or a tiny curved line on the upper part of the black pupil for the eye highlight. This adds sparkle and life to the eyes.
•Black Outline: Using Black yarn, carefully embroider a thin outline around the entire eye (around the yellow/orange iris). This defines the eyes and gives them the distinct King Julien look.
5.Eyebrows (Black Yarn):
•Using Black yarn, embroider thin, slightly arched eyebrows above the eyes. These contribute significantly to his expression.
6.Fur Effect (Dark Grey/Black Yarn):
•For the fuzzy effect around his face (cheeks, chin, and possibly a bit on top of the head), cut short strands of Dark Grey/Black yarn (about 1-2 inches long).
•Using your crochet hook or a tapestry needle, insert the hook into a stitch where you want fur, loop a strand of yarn through, and tie a knot (similar to attaching fringe). Repeat this process, placing strands close together for a dense fur effect.
•Alternatively, you can use a wire brush (like a pet brush) to gently brush the surface of the crocheted fabric around the face. This will pull up the fibers of the yarn, creating a fuzzy, brushed look. Be gentle to avoid damaging the stitches.
•Trim the fur to your desired length and shape.
Finishing
•Weave in all remaining loose ends securely.
•Gently shape your King Julien amigurumi, ensuring all parts are well-stuffed and proportioned.
•Give him a royal pose and enjoy your new lemur king!