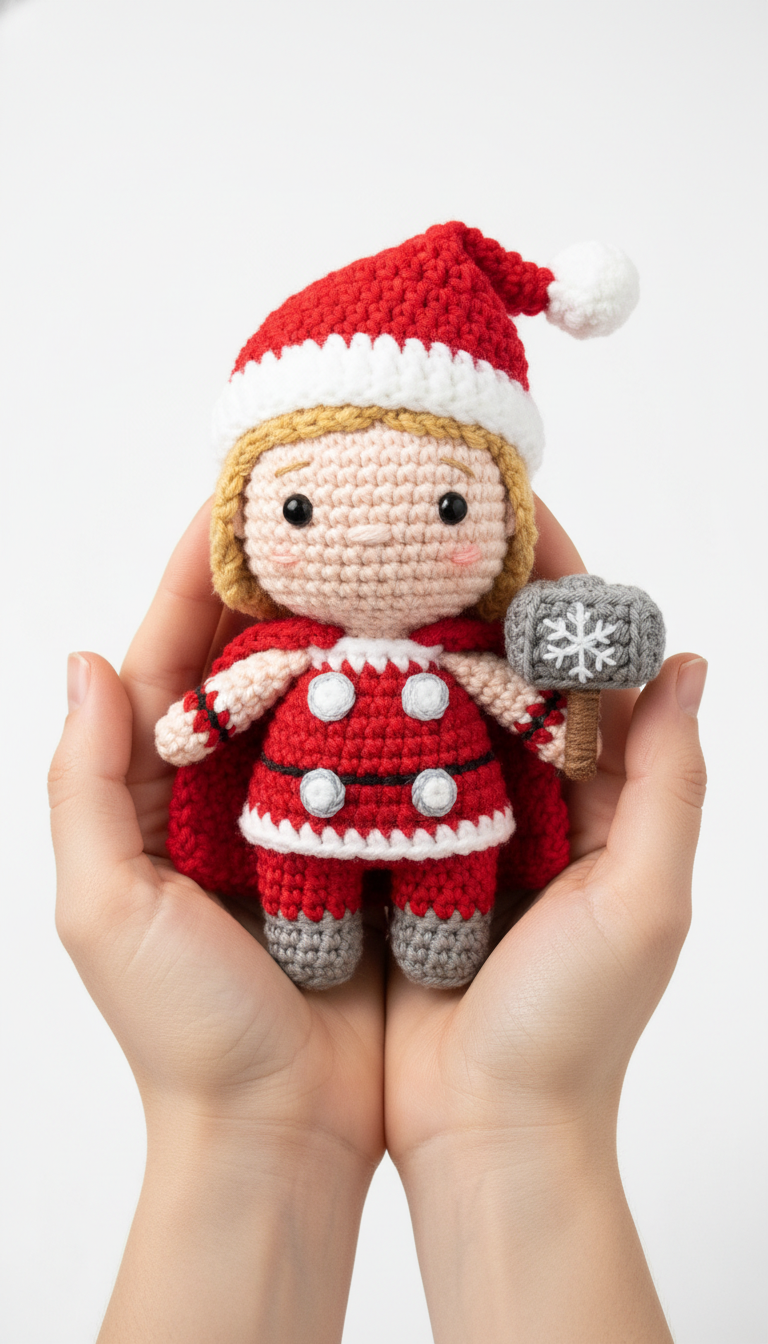
Get ready to bring some superhero cheer to your holidays with this adorable Christmas Thor Amigurumi doll! Perfect for fans of all ages, this pattern transforms the mighty hero into a festive, cuddly companion, complete with a Santa hat and a snowflake-adorned Mjolnir. This unique handmade gift or decoration is sure to spark joy.
Unleash Holiday Might with Your Own Crocheted Hero!
Whether you’re looking for a special holiday gift, a charming decoration for your home, or a fun personal project, this Christmas Thor Amigurumi pattern is a fantastic choice. Craft a unique piece that combines the epic power of a superhero with the heartwarming spirit of Christmas, creating a truly special item that will be cherished.
Crochet Pattern: Mighty Festive Amigurumi Hero: Crochet Your Own Christmas Thor Doll!
Materials
- DK weight yarn in Skin Tone (light peach/beige)
- DK weight yarn in Red
- DK weight yarn in White
- DK weight yarn in Gray
- DK weight yarn in Light Brown (for hair and hammer handle)
- Small amount of DK weight yarn in Black (for eyes/details)
- Small amount of DK weight yarn in Light Pink (for cheeks)
- 2.5mm crochet hook
- 6mm black safety eyes
- Polyester fiberfill for stuffing
- Tapestry needle
- Stitch marker
- Scissors
Abbreviations
- MR: Magic Ring
- ch: chain
- sc: single crochet
- inc: increase (2 sc in one stitch)
- dec: decrease (sc 2 stitches together)
- sl st: slip stitch
- FO: Fasten off
- BLO: back loop only
- FLO: front loop only
- Rnd: Round
Instructions
Head and Body (worked in one piece)
Head (Skin Tone yarn)
- Rnd 1: MR, 6 sc (6)
- Rnd 2: 6 inc (12)
- Rnd 3: (sc, inc) x6 (18)
- Rnd 4: (2 sc, inc) x6 (24)
- Rnd 5: (3 sc, inc) x6 (30)
- Rnd 6: (4 sc, inc) x6 (36)
- Rnd 7-13: sc around (36) – 7 rounds
- Rnd 14: (4 sc, dec) x6 (30)
- Rnd 15: (3 sc, dec) x6 (24)
- Insert safety eyes between Rnd 11 and 12, about 6 stitches apart. Stuff head firmly.
- Rnd 16: (2 sc, dec) x6 (18)
Body (Red yarn)
- Rnd 17: (sc, dec) x6 (12)
- Rnd 18: (sc, inc) x6 (18)
- Rnd 19: (2 sc, inc) x6 (24)
- Rnd 20-23: sc around (24) – 4 rounds
- Rnd 24: (3 sc, inc) x6 (30)
- Rnd 25-26: sc around (30)
- Rnd 27: (3 sc, dec) x6 (24)
- Rnd 28: sc around (24)
- Continue stuffing as you go. FO, leaving a long tail for sewing.
Arms (Make 2)
Hand (Skin Tone yarn)
- Rnd 1: MR, 6 sc (6)
- Rnd 2-3: sc around (6)
Sleeve (Red yarn)
- Rnd 4: Change to Red yarn, sc around (6)
- Rnd 5-8: sc around (6) – 4 rounds. Stuff lightly.
- FO, leaving a long tail for sewing.
Cuff Detail: Using White yarn and tapestry needle, embroider a small horizontal line of stitches around Rnd 4, and then a thin black line just below the white line.
Legs (Make 2)
Boot (Gray yarn)
- Rnd 1: MR, 6 sc (6)
- Rnd 2: 6 inc (12)
- Rnd 3-5: sc around (12)
Pants (Red yarn)
- Rnd 6: Change to Red yarn, sc around (12)
- Rnd 7-10: sc around (12) – 4 rounds. Stuff lightly.
Cuff (White yarn)
- Rnd 11: Change to White yarn, sc around (12)
- Rnd 12: sc around (12)
- FO, leaving a long tail for sewing.
Santa Hat
Hat (Red yarn)
- Rnd 1: MR, 6 sc (6)
- Rnd 2: (sc, inc) x3 (9)
- Rnd 3: sc around (9)
- Rnd 4: (2 sc, inc) x3 (12)
- Rnd 5: sc around (12)
- Rnd 6: (3 sc, inc) x3 (15)
- Rnd 7: sc around (15)
- Rnd 8: (4 sc, inc) x3 (18)
- Rnd 9: sc around (18)
- Rnd 10: (5 sc, inc) x3 (21)
- Rnd 11: sc around (21)
- Rnd 12: (6 sc, inc) x3 (24)
- Rnd 13: sc around (24)
- Rnd 14: (7 sc, inc) x3 (27)
Brim (White yarn)
- Rnd 15: Change to White yarn, sc around (27)
- Rnd 16: sc around (27)
- FO.
Pompom (White yarn)
- Wrap yarn around two fingers multiple times. Tie off tightly in the middle and cut loops to form a pompom. Trim to desired size and sew to the tip of the hat.
Cape (Red yarn)
- Ch 15.
- Row 1: sc in 2nd ch from hook and across (14). Ch 1, turn.
- Row 2-10: sc across (14). Ch 1, turn.
- FO, leaving a long tail for sewing.
Hammer
Hammer Head (Gray yarn)
- Ch 6. Join to form a loop.
- Rnd 1: sc in each ch around (6).
- Rnd 2: 6 inc (12)
- Rnd 3-6: sc around (12)
- Rnd 7: 6 dec (6). Stuff firmly.
- FO, close opening.
Handle (Light Brown yarn)
- Ch 6.
- Row 1: sc in 2nd ch from hook and across (5).
- Row 2-5: sc across (5). Ch 1, turn.
- FO, leaving a long tail for sewing. Roll into a cylinder and sew edges together to form a handle.
Assembly
Attach Limbs: Sew the arms to the sides of the body just below the neck. Sew the legs to the bottom of the body.
Hair: Using Light Brown yarn, cut several strands (approx. 4-5 inches long). Loop and knot them onto the head around the face and back, creating a layered hair effect as seen in the image. You can also crochet small rows of sc and sew them on.
Embroidered Details:
- Face: Embroider a small mouth with Black yarn and blush marks with Light Pink yarn.
- Suit Details: For the circular details on the red suit, crochet 4 small white circles: MR, 6 sc, sl st to join, FO. Sew these onto the red body. Embroider a small gray dot in the center of each white circle.
- Belt/Trim: Using Black yarn, surface sl st a thin line around the waist, and around the top edge of the red pants. Using White yarn, surface sl st a decorative zig-zag or wavy line on the lower part of the red suit, above the leg cuffs. Add small white surface sl st details near the collar.
- Cape: Sew the cape to the back of the body, just below the head.
- Hammer: Sew the light brown handle to the gray hammer head. Using White yarn, embroider a snowflake design onto one side of the gray hammer head.
Hat: Place the Santa hat on the doll’s head. You can sew a few stitches to secure it if desired.