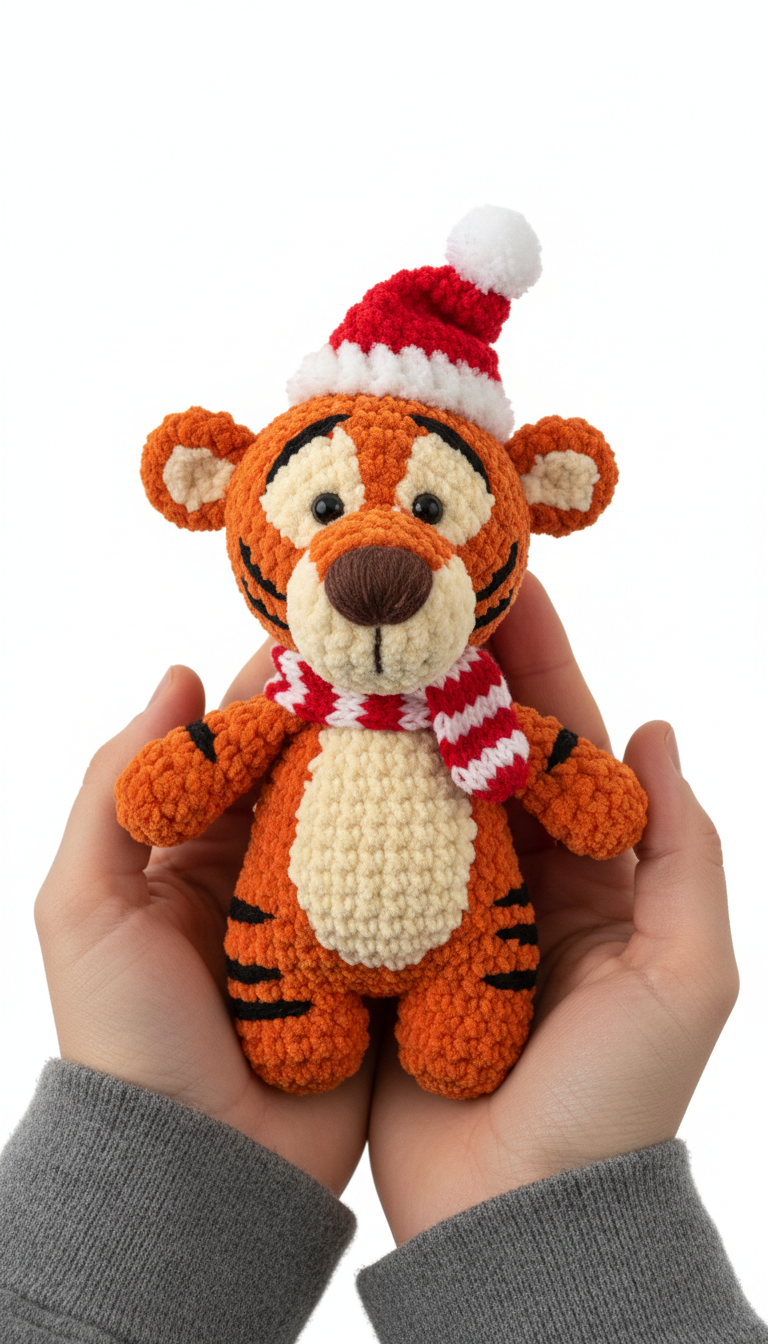
Get ready to crochet the most adorable holiday companion with this detailed pattern for a Festive Striped Amigurumi Tiger! Perfect for adding a touch of handmade charm to your Christmas decor or gifting to a loved one, this tiger sports a cute Santa hat and a festive striped scarf. Bring this lovable creature to life with soft yarn and simple stitches.
Craft Your Own Roaringly Cute Christmas Decor
This charming crochet Christmas tiger is more than just a toy; it’s a handmade heirloom in the making. Imagine the delight on a child’s face, or the festive cheer it adds to your mantelpiece. Crafting this amigurumi brings the warmth of the holidays right into your home, making it a truly special project for the season.
Crochet Pattern: Roaringly Cute Crochet Christmas Tiger Amigurumi Pattern with Santa Hat
Materials
- Worsted weight yarn in Orange
- Worsted weight yarn in Cream
- Worsted weight yarn in Black
- Worsted weight yarn in Red
- Worsted weight yarn in White
- Small amount of Brown embroidery floss (for nose)
- 2.5mm or 3.0mm crochet hook (or size suitable for your yarn)
- 6mm safety eyes
- Polyester fiberfill for stuffing
- Tapestry needle
- Scissors
- Stitch marker
Abbreviations
- MR: Magic Ring
- sc: single crochet
- inc: increase (2 sc in one stitch)
- dec: decrease (sc 2 stitches together)
- ch: chain
- st(s): stitch(es)
- Rnd: Round
- Row: Row
- x: repeat
Instructions
Get ready to crochet the most adorable holiday companion with this detailed pattern for a Festive Striped Amigurumi Tiger! Perfect for adding a touch of handmade charm to your Christmas decor or gifting to a loved one, this tiger sports a cute Santa hat and a festive striped scarf.
Size: Approximately 6-7 inches tall (when made with specified materials)
Head (Orange Yarn)
- Rnd 1: Start with a Magic Ring (MR), work 6 sc into the ring. (6)
- Rnd 2: Inc in each st around. (12)
- Rnd 3: (Sc 1, inc) x 6. (18)
- Rnd 4: (Sc 2, inc) x 6. (24)
- Rnd 5: (Sc 3, inc) x 6. (30)
- Rnd 6-10: Sc in each st around. (30)
- Rnd 11: (Sc 3, dec) x 6. (24)
- Rnd 12: (Sc 2, dec) x 6. (18)
- Insert safety eyes between Rnd 8 and 9, about 6-7 stitches apart. Start stuffing firmly.
- Rnd 13: (Sc 1, dec) x 6. (12)
- Rnd 14: Dec x 6. (6)
- Fasten off, leave a long tail to close the hole.
Muzzle (Cream Yarn)
- Rnd 1: MR, work 6 sc into the ring. (6)
- Rnd 2: Inc in each st around. (12)
- Rnd 3: (Sc 1, inc) x 6. (18)
- Rnd 4-5: Sc in each st around. (18)
- Fasten off, leave a long tail for sewing. Lightly stuff and sew onto the face, centered below the eyes.
- Embroider a triangular nose with brown yarn on the top center of the muzzle. Embroider a small black line for the mouth just below the nose.
Ears (Make 2 – Orange Yarn with Cream inner)
- Outer Ear (Orange):
- Rnd 1: MR, 6 sc. (6)
- Rnd 2: Inc in each st around. (12)
- Fasten off, leave a tail.
- Inner Ear (Cream):
- Rnd 1: MR, 5 sc. (5)
- Fasten off, leave a tail.
- Sew the cream inner ear piece onto the center of the orange outer ear piece. Fold the completed ear flat and sew onto the head between Rnd 3 and 6.
Body (Orange Yarn, Cream for belly)
- Rnd 1: MR, 6 sc. (6)
- Rnd 2: Inc in each st around. (12)
- Rnd 3: (Sc 1, inc) x 6. (18)
- Rnd 4: (Sc 2, inc) x 6. (24)
- Rnd 5: (Sc 3, inc) x 6. (30)
- Rnd 6: (Sc 4, inc) x 6. (36)
- Rnd 7-10: Sc in each st around. (36)
- Rnd 11: Start belly color change: (Sc 12 orange, sc 6 cream, sc 18 orange). (36)
- Rnd 12: (Sc 12 orange, sc 6 cream, sc 18 orange). (36)
- Rnd 13: (Sc 12 orange, sc 6 cream, sc 18 orange). (36)
- Rnd 14: Switch back to orange: Sc in each st around. (36)
- Rnd 15: (Sc 4, dec) x 6. (30)
- Rnd 16: Sc in each st around. (30)
- Rnd 17: (Sc 3, dec) x 6. (24)
- Start stuffing firmly.
- Rnd 18: (Sc 2, dec) x 6. (18)
- Fasten off, leave a long tail for sewing. Continue stuffing.
Arms (Make 2 – Orange Yarn)
- Rnd 1: MR, 6 sc. (6)
- Rnd 2: (Sc 1, inc) x 3. (9)
- Rnd 3-7: Sc in each st around. (9)
- Lightly stuff the end of the arm. Flatten the opening and sc 3 through both layers to close. Fasten off, leave a tail for sewing.
Legs (Make 2 – Orange Yarn)
- Rnd 1: MR, 6 sc. (6)
- Rnd 2: Inc in each st around. (12)
- Rnd 3-6: Sc in each st around. (12)
- Lightly stuff. Flatten the opening and sc 6 through both layers to close. Fasten off, leave a tail for sewing.
Tail (Orange Yarn with Black stripes)
- Rnd 1: MR, 5 sc. (5)
- Rnd 2-7: Sc in each st around. (5)
- Change to black yarn.
- Rnd 8-9: Sc in each st around. (5)
- Change to orange yarn.
- Rnd 10-15: Sc in each st around. (5)
- Fasten off, leave a tail for sewing. Do not stuff.
Santa Hat (Red and White Yarn)
- Hat (Red Yarn):
- Rnd 1: MR, 4 sc. (4)
- Rnd 2: Sc in each st around. (4)
- Rnd 3: (Sc 1, inc) x 2. (6)
- Rnd 4: Sc in each st around. (6)
- Rnd 5: (Sc 2, inc) x 2. (8)
- Rnd 6: Sc in each st around. (8)
- Rnd 7: (Sc 3, inc) x 2. (10)
- Rnd 8: Sc in each st around. (10)
- Rnd 9: (Sc 4, inc) x 2. (12)
- Rnd 10: (Sc 5, inc) x 2. (14)
- Hat Brim (White Yarn):
- Attach white yarn to the last stitch of Rnd 10 of the hat.
- Rnd 11: Sc in each st around. (14)
- Rnd 12: Sc in each st around. (14)
- Fasten off, weave in ends.
- Pompom (White Yarn): Make a small white pompom and securely sew it to the tip of the hat.
Scarf (Red and White Yarn)
- Chain 40 with red yarn.
- Row 1: Sc in the 2nd ch from hook and in each ch across. (39)
- Row 2: Ch 1, turn. Sc in each st across. (39)
- Change to white yarn.
- Row 3-4: Ch 1, turn. Sc in each st across. (39)
- Change to red yarn.
- Row 5-6: Ch 1, turn. Sc in each st across. (39)
- Fasten off, weave in ends.
Assembly
- Sew the Head to the top of the Body.
- Sew the Arms to the sides of the Body, just below the neck.
- Sew the Legs to the bottom of the Body.
- Sew the Tail to the back of the Body.
- Embroider small black stripes onto the tiger’s body, arms, legs, and face (above the eyes and on the cheeks) as shown in the image.
- Place the Santa hat on the tiger’s head and the scarf around its neck. Secure with a few stitches if desired.