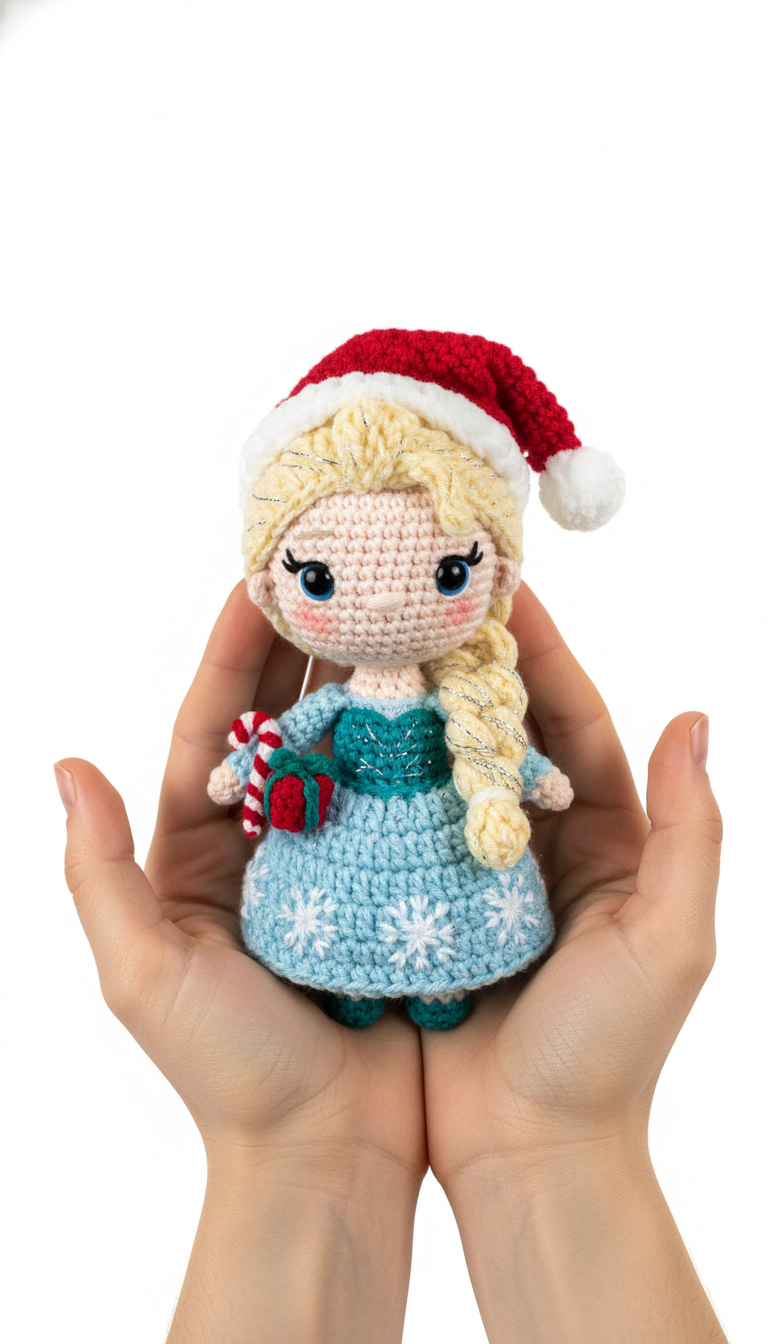
Capture the magic of the holidays with this enchanting Christmas Princess Amigurumi! This delightful crochet pattern lets you create a festive doll inspired by everyone’s favorite ice queen, complete with a tiny Santa hat and charming holiday accessories. Perfect for seasonal decor or a special handmade gift, this amigurumi brings a touch of wintry wonder to your celebrations. Get ready to crochet some holiday cheer!
Bring Frozen Festivities to Life with a Handmade Touch
There’s something uniquely special about handmade gifts, and this Christmas Princess Amigurumi is no exception. Crafting this doll allows you to infuse each stitch with love and personal flair, creating a cherished keepsake for years to come. Whether adorning your mantelpiece or delighting a loved one, this festive amigurumi is a heartwarming symbol of the season’s joy and creativity.
Crochet Pattern: Sparkling Christmas Princess Amigurumi: Crochet Your Own Festive Elsa-Inspired Doll!
Materials
- Sport or DK weight yarn in: Light Peach (skin), Light Blonde (hair), Silver metallic thread (hair sparkle), Teal/Turquoise (bodice, shoes), Light Blue (skirt), White (snowflakes, hat trim, pom-pom, candy cane), Red (hat, gift, candy cane), Green (gift ribbon), Black (eyelashes), Dark Blue (eyes), Pink (cheeks)
- Crochet Hook: 2.0mm
- 6mm or 8mm Blue Safety Eyes
- Polyester Fiberfill for stuffing
- Tapestry Needle
- Stitch Marker
- Scissors
Abbreviations
- MR: Magic Ring
- ch: chain
- sc: single crochet
- inc: increase (2 sc in one stitch)
- dec: decrease (sc 2 together)
- sl st: slip stitch
- FO: Fasten off
- Rnd: Round
- st(s): stitch(es)
- BLO: back loop only
- FLO: front loop only
- […] x N: Repeat instructions in brackets N times
Instructions
Head & Body (Light Peach yarn for Head/Body, Teal/Turquoise for Shoes)
- Head:
- Rnd 1: Start with a MR, 6 sc into the ring. (6)
- Rnd 2: [inc] x 6. (12)
- Rnd 3: [sc, inc] x 6. (18)
- Rnd 4: [2 sc, inc] x 6. (24)
- Rnd 5: [3 sc, inc] x 6. (30)
- Rnd 6: [4 sc, inc] x 6. (36)
- Rnd 7-12: Sc in each st around. (36) (6 rounds)
- Insert 6mm or 8mm blue safety eyes between Rnd 9 and 10, approximately 6-7 stitches apart. Embroider eyebrows and eyelashes with black yarn, and delicate blush with pink yarn.
- Rnd 13: [4 sc, dec] x 6. (30)
- Rnd 14: [3 sc, dec] x 6. (24)
- Start stuffing the head firmly.
- Rnd 15: [2 sc, dec] x 6. (18)
- Rnd 16: [sc, dec] x 6. (12) (Neck section)
- Rnd 17: Sc in each st around. (12)
- Body:
- Rnd 18: [inc] x 12. (24)
- Rnd 19-24: Sc in each st around. (24) (6 rounds)
- Rnd 25: [2 sc, dec] x 6. (18)
- Rnd 26-28: Sc in each st around. (18) (3 rounds)
- Rnd 29: [sc, dec] x 6. (12)
- Rnd 30: Sc in each st around. (12)
- Stuff the body firmly as you go.
- Legs (Work in rows to split for legs):
- Flatten the opening of Rnd 30. Sc across 6 stitches, turn. (This forms the first leg opening)
- First Leg:
- Rnd 1: Ch 1, sc in 6 sts, then work 6 sc into the remaining 6 sts of Rnd 30, joining to form a round of 12 sts. (12)
- Rnd 2-5: Sc in each st around. (12) (4 rounds in Light Peach)
- Switch to Teal/Turquoise yarn.
- Rnd 6: Sc in each st around. (12)
- Rnd 7: [dec] x 6. (6)
- Stuff the leg firmly. FO, weave in ends to close.
- Second Leg:
- Attach Light Peach yarn to the remaining 6 sts from Rnd 30, and repeat instructions for the First Leg.
Arms (Make 2, Light Peach yarn)
- Rnd 1: Start with a MR, 6 sc into the ring. (6)
- Rnd 2-8: Sc in each st around. (6) (7 rounds)
- Stuff lightly. Flatten the opening and sc across to close. (3 sc) FO, leave a long tail for sewing.
Hair (Light Blonde yarn with Silver metallic thread)
- Cut strands of Light Blonde yarn and Silver metallic thread approximately 10-12 inches long.
- Using your crochet hook, loop individual strands through the stitches on the doll’s head, starting from the crown and working down towards the forehead and sides.
- Distribute the hair evenly. Style the hair into a long braid, securing it with a small piece of yarn.
Dress (Teal/Turquoise yarn for Bodice, Light Blue yarn for Skirt)
Work the dress directly onto the doll.
Bodice (Teal/Turquoise yarn)
- Attach Teal/Turquoise yarn to a stitch on the doll’s body around Rnd 20 (mid-torso/waist area).
- Rnd 1: Ch 1, sc in each st around the body (approx. 24 sts, adjust to fit your doll), join with sl st to first sc. (24)
- Rnd 2-4: Ch 1, sc in each st around, join with sl st. (24) (3 rounds to form the bodice)
- FO, weave in ends.
Skirt (Light Blue yarn)
- Attach Light Blue yarn to the bottom edge of the bodice (the same row where you started the bodice, but working downwards).
- Rnd 1: Ch 1, [3 sc, inc] x 6. Join with sl st. (30)
- Rnd 2: Ch 1, [4 sc, inc] x 6. Join with sl st. (36)
- Rnd 3: Ch 1, [5 sc, inc] x 6. Join with sl st. (42)
- Rnd 4-10: Ch 1, sc in each st around. Join with sl st. (42) (7 rounds, adjust length as desired)
- Snowflakes: Using White yarn and a tapestry needle, surface embroider small snowflake shapes onto the skirt, as shown in the image.
- FO, weave in ends.
Santa Hat (Red yarn, then White yarn)
Hat Top (Red yarn)
- Rnd 1: Start with a MR, 6 sc into the ring. (6)
- Rnd 2: [sc, inc] x 3. (9)
- Rnd 3: Sc in each st around. (9)
- Rnd 4: [2 sc, inc] x 3. (12)
- Rnd 5: Sc in each st around. (12)
- Rnd 6: [3 sc, inc] x 3. (15)
- Rnd 7: Sc in each st around. (15)
- Rnd 8: [4 sc, inc] x 3. (18)
- Rnd 9: Sc in each st around. (18)
- Rnd 10: [5 sc, inc] x 3. (21)
- Rnd 11: Sc in each st around. (21)
- Rnd 12: [6 sc, inc] x 3. (24)
- Rnd 13: Sc in each st around. (24)
- Rnd 14: [7 sc, inc] x 3. (27)
- Rnd 15: Sc in each st around. (27)
- Rnd 16: [8 sc, inc] x 3. (30)
- Rnd 17: Sc in each st around. (30)
Hat Trim (White yarn)
- Rnd 18: Attach White yarn, ch 1, sc in each st around. Join with sl st to first sc. (30)
- FO.
- Make a small white pom-pom (or use a store-bought one) and attach it to the tip of the hat.
Candy Cane (Red and White yarn)
- Using Red yarn, ch 6. Switch to White yarn, ch 6. Repeat alternating colors for approximately 24-30 chains total (4-5 stripes).
- Sc in the 2nd ch from hook and in each ch across.
- Carefully twist the strip of crochet into a candy cane shape and lightly stiffen if desired, or just sew to hold the shape.
Gift (Red yarn, Green yarn)
- Using Red yarn, ch 5. Sc in 2nd ch from hook and across. (4 sc) Ch 1, turn.
- Repeat for 4 rows to create a small square. (Make 6 squares).
- Sew the 6 squares together to form a small cube.
- Using Green yarn and a tapestry needle, embroider a ribbon and bow around the gift cube.
Final Assembly
- Sew the arms to the sides of the upper body, just below the neck.
- Carefully place the Santa hat on the doll’s head.
- Sew the candy cane to one hand and the gift to the other hand, as desired.
- Your Sparkling Christmas Princess Amigurumi is complete!