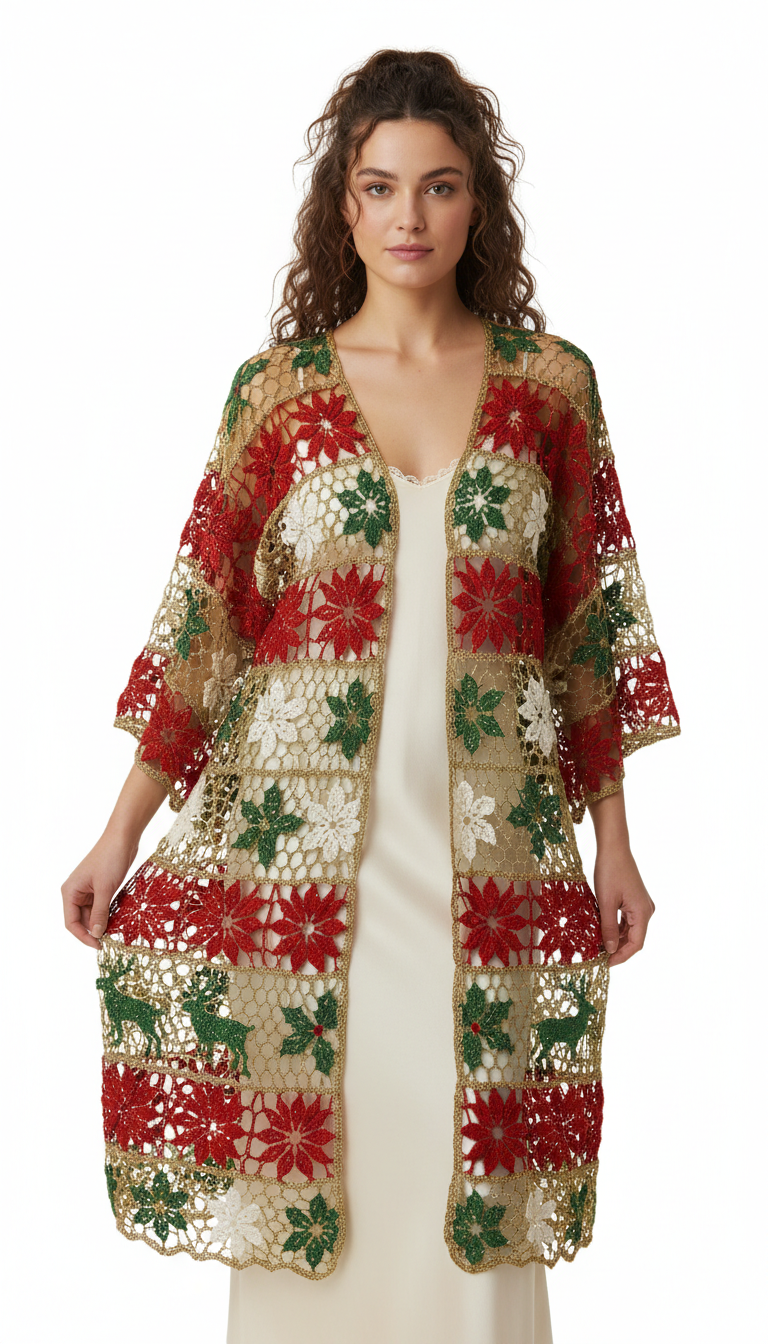
Embrace the festive spirit with our exquisite Crochet Christmas Kimono Cardigan pattern! This stunning garment, adorned with charming holiday motifs like poinsettias, holly, and reindeer, is perfect for adding a touch of handmade elegance to your holiday wardrobe. Worked in a beautiful grid of squares with shimmering gold accents, it’s a project that’s as enjoyable to make as it is to wear.
Craft Your Own Festive Fashion Statement
Unleash your creativity this holiday season by crafting a unique piece that will turn heads at any gathering. This cardigan isn’t just a garment; it’s a wearable celebration of joy and the art of crochet. Imagine the compliments you’ll receive while draped in your handmade masterpiece, bringing warmth and sparkle to your festive moments.
Crochet Pattern: Sparkling Holiday Crochet Kimono Cardigan Pattern
Materials
- DK weight yarn in Red (Yarn A)
- DK weight yarn in Forest Green (Yarn B)
- DK weight yarn in White (Yarn C)
- DK weight yarn in Gold Shimmer/Metallic (Yarn D)
- Crochet Hook size H (5.0mm)
- Yarn needle
- Scissors
Abbreviations
- ch – chain
- sl st – slip stitch
- sc – single crochet
- hdc – half double crochet
- dc – double crochet
- tr – treble crochet
- st(s) – stitch(es)
- sp – space
- rnd – round
- rep – repeat
- YO – yarn over
Instructions
This cardigan is constructed from individual crochet squares joined together. There are four types of motif squares: Poinsettia, Holly, Reindeer, and a simple Star/Flower square. Each square is approximately 4×4 inches before joining.
- Gauge: 4 inches = 16 dc x 8 rows in pattern. Adjust hook size if necessary.
Holiday Motif Square (Make approximately 120-150 squares, varying colors as desired for desired pattern)
All squares start with a central motif (Red Poinsettia, Green Holly, Green Reindeer, White Star/Flower) and are then ‘squared up’ with a Gold Shimmer border.
Note: Detailed instructions for complex pictorial motifs like Reindeer and intricate Holly would typically require a charted design for tapestry crochet or intarsia. For simplicity in this pattern, we provide a basic interpretation that can be embellished or substituted with embroidery for precise shapes.
- Poinsettia Motif (Red Yarn A):
- Ch 4, sl st to first ch to form a ring.
- Rnd 1: Ch 3 (counts as dc), 11 dc into ring. Sl st to top of ch 3. (12 dc)
- Rnd 2 (Petals): *Ch 3, dc into same st, 2 tr into next st, dc into same st as last dc, ch 3, sl st into next st.* Rep from * to * 5 more times. You will have 6 petals. Fasten off Red.
- Holly Motif (Green Yarn B):
- Ch 4, sl st to first ch to form a ring.
- Rnd 1: Ch 2 (counts as hdc), 9 hdc into ring. Sl st to top of ch 2. (10 hdc)
- Rnd 2 (Leaves): *Ch 3, (dc, tr, dc) in next st, ch 3, sl st in next st.* Rep from * to * 4 more times. (5 leaves) Fasten off Green. (For berries, you can embroider small red beads or French knots onto the center of the square after completion.)
- Reindeer Motif (Green Yarn B):
- Create a plain 3×3 inch solid square in Green (Yarn B) using hdc or dc stitches. Then, using a contrasting color yarn (e.g., Brown) and a smaller hook or embroidery needle, embroider a simple reindeer silhouette onto the center of the square.
- Star/Flower Motif (White Yarn C):
- Ch 4, sl st to first ch to form a ring.
- Rnd 1: Ch 3 (counts as dc), 11 dc into ring. Sl st to top of ch 3. (12 dc)
- Rnd 2 (Petals): *Ch 2, (dc, tr, dc) in next st, ch 2, sl st in next st.* Rep from * to * 5 more times. (6 petals) Fasten off White.
Squaring Up the Motif (Gold Shimmer Yarn D – for all squares)
This creates the mesh border around each motif, turning it into a square and providing the joining element.
- Join Gold Yarn D with a sl st to any sl st between petals/leaves of your chosen motif, or into a corner for plain squares.
- Rnd 1: Ch 2 (counts as hdc), 2 hdc in same sp. (3 hdc cluster in a corner). Ch 2. *3 hdc in next available sp/st. Ch 2. (3 hdc cluster, ch 2, 3 hdc cluster) in next corner sp. Ch 2.* Rep from * to * twice more. 3 hdc in final sp/st. Ch 2. Sl st to top of first ch 2. (This round creates the initial square shape using hdc clusters and chain spaces.)
- Rnd 2 (Mesh Border): Ch 1, sc in each hdc and ch-sp around. For corners, (sc, ch 2, sc) in each ch-2 corner sp. Sl st to first sc. Fasten off. You should have a square with a distinct gold border and a mesh-like appearance.
Assembly of Squares
- Arrange your completed squares into the desired pattern for the front panels, back panel, and sleeves. Refer to the image for inspiration on color and motif placement (e.g., alternating colors, creating stripes of motifs).
- Using Gold Shimmer Yarn D and a sl st or sc join method (e.g., ‘join-as-you-go’ for a seamless look, or whip stitch/slip stitch through the back loops of the final sc row of each square), join the squares together.
- Create one large rectangular back panel (e.g., 6 squares wide x 10-12 squares long, adjust for desired length and width).
- Create two narrower front panels (e.g., 3 squares wide x 10-12 squares long each).
- Create two rectangular sleeve panels (e.g., 4-5 squares wide x 6-8 squares long, tapered slightly if desired).
Constructing the Cardigan
- Joining Panels:
- Lay out the back panel. Place the front panels on top, aligning shoulder sections.
- Sew (or sl st/sc together) the shoulder seams and side seams using Gold Shimmer Yarn D. Leave armholes open for the sleeves.
- Join the sleeve panels to the armholes.
- Sew the underarm and side seams of the sleeves.
Edging
- Using Gold Shimmer Yarn D, work a simple edging around the entire opening of the cardigan (front edges and neckline), and around the sleeve cuffs.
- Rnd 1: Sc evenly around the entire opening, placing (sc, ch 2, sc) at any sharp corners (like the bottom front corners). Sl st to first sc.
- Rnd 2: Ch 1, *sc in next sc, ch 1, skip 1 st.* Rep from * around. Sl st to first sc. This creates a delicate mesh edge.
- Fasten off and weave in all ends securely.
Your beautiful Crochet Christmas Kimono Cardigan is complete! Enjoy wearing your festive, handmade creation.