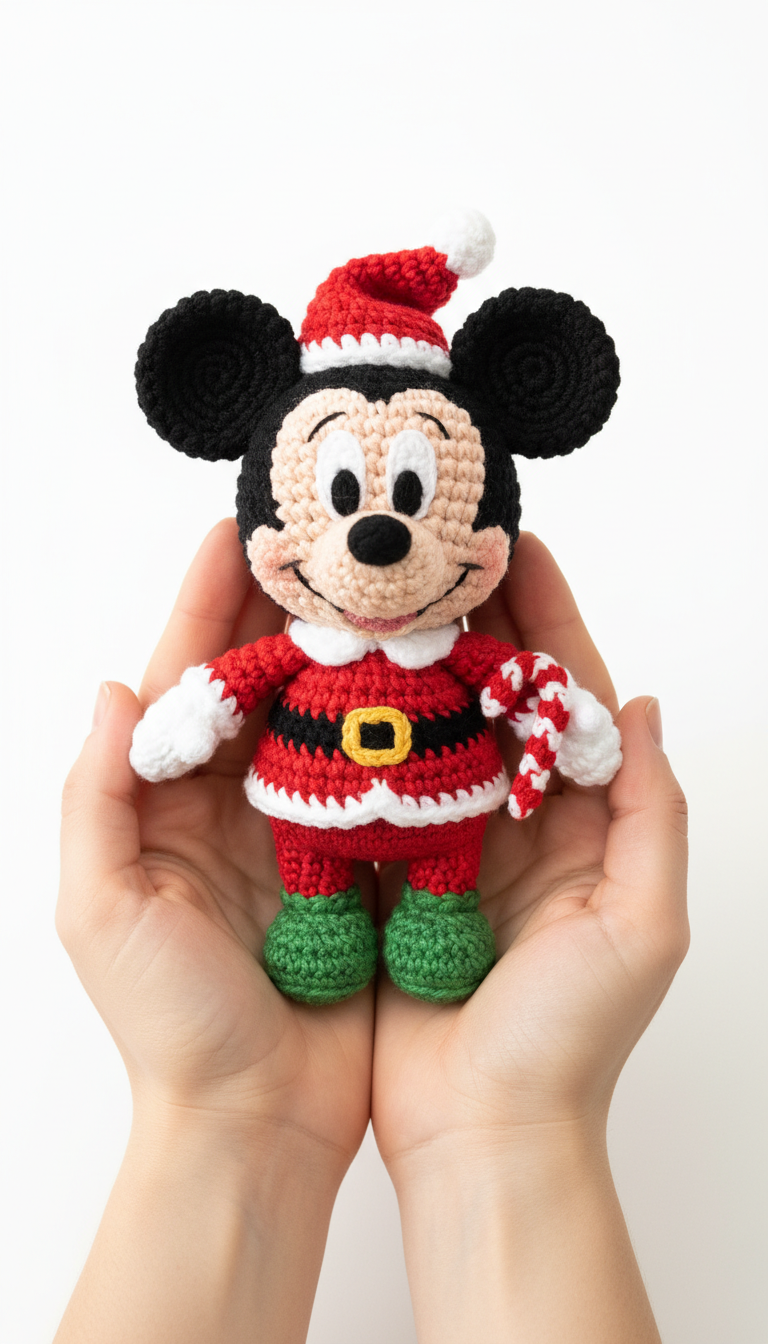
Get ready to add a touch of Disney magic to your festive decorations with this adorable Santa Mickey Amigurumi! Perfect for gifting or adorning your home, this pattern lets you crochet everyone’s favorite mouse in his cheerful holiday best. With his iconic red suit and a tiny candy cane, he’s sure to bring smiles throughout the season.
Craft a Magical Christmas Keepsake
There’s nothing quite like a handmade gift to show you care, and this Santa Mickey is no exception. Creating this charming amigurumi offers a wonderful way to relax and unleash your creativity, resulting in a unique keepsake that will be cherished for years. Imagine the joy on a loved one’s face receiving this festive, hand-crocheted treasure!
Crochet Pattern: Spread Holiday Cheer: Crochet Your Own Santa Mickey Amigurumi!
Materials
- Yarn A: Black (for ears, belt stripe, nose)
- Yarn B: Skin Tone / Light Peach (for face, hands)
- Yarn C: Red (for hat, suit, pants, candy cane stripe)
- Yarn D: White (for hat trim, collar, cuffs, belt trim, candy cane stripe, eye highlights)
- Yarn E: Green (for shoes)
- Yarn F: Yellow (for belt buckle)
- 2.5mm or 3.0mm crochet hook (or size suitable for your yarn to achieve tight stitches)
- Safety eyes (6mm-8mm) or black embroidery thread for eyes
- Stuffing (polyester fiberfill)
- Yarn needle
- Scissors
- Stitch markers (optional)
Abbreviations
- MR: Magic Ring
- ch: chain
- sc: single crochet
- inc: increase (2 sc in one stitch)
- dec: decrease (sc two stitches together)
- sl st: slip stitch
- FO: Fasten off
- Rnd: Round
- st(s): stitch(es)
- (): Repeat instructions in parentheses for the specified number of times
- []: Total number of stitches at the end of the round
Instructions
Head (Yarn B: Skin Tone)
- Rnd 1: 6 sc in MR [6]
- Rnd 2: (inc) x6 [12]
- Rnd 3: (sc, inc) x6 [18]
- Rnd 4: (2 sc, inc) x6 [24]
- Rnd 5: (3 sc, inc) x6 [30]
- Rnd 6: (4 sc, inc) x6 [36]
- Rnd 7-12: sc in each st around [36] (6 rounds)
Insert safety eyes between Rnd 9 and 10, about 6-7 stitches apart. Embroider eyebrows and a smile using black embroidery thread.
- Rnd 13: (4 sc, dec) x6 [30]
- Rnd 14: (3 sc, dec) x6 [24]
Stuff head firmly.
- Rnd 15: (2 sc, dec) x6 [18]
- Rnd 16: (sc, dec) x6 [12]
FO, leaving a long tail for sewing. Finish stuffing and close the opening.
Ears (Yarn A: Black, make 2)
- Rnd 1: 6 sc in MR [6]
- Rnd 2: (inc) x6 [12]
- Rnd 3: (sc, inc) x6 [18]
FO, leaving a long tail for sewing. Do not stuff. Flatten and sew to the sides of the head between Rnd 3-7.
Nose (Yarn A: Black)
- Rnd 1: 4 sc in MR [4]
- Rnd 2: (inc) x4 [8]
- Rnd 3: sc in each st around [8]
FO, leaving a long tail. Stuff lightly and sew onto the face below the eyes.
Body (Start with Yarn C: Red)
- Rnd 1: 6 sc in MR [6]
- Rnd 2: (inc) x6 [12]
- Rnd 3: (sc, inc) x6 [18]
- Rnd 4: (2 sc, inc) x6 [24]
- Rnd 5: (3 sc, inc) x6 [30]
- Rnd 6-9: sc in each st around [30] (4 rounds)
- Rnd 10: Change to Yarn A (Black). sc in each st around [30]
- Rnd 11: Change to Yarn C (Red). sc in each st around [30]
- Rnd 12: (3 sc, dec) x6 [24]
Stuff body firmly as you go.
- Rnd 13: sc in each st around [24]
- Rnd 14: (2 sc, dec) x6 [18]
- Rnd 15: sc in each st around [18]
FO, leaving a long tail for sewing to the head.
Collar (Yarn D: White)
- Ch 18. Start from 2nd ch from hook, sc in each ch across [17].
FO, leaving a long tail. Sew around the neck opening of the body.
Belt Buckle (Yarn F: Yellow)
- Ch 8. Join with sl st to form a ring.
- Ch 1, sc in each ch around. Sl st to first sc. [8]
FO, leaving a long tail. Form a square/rectangle shape and sew onto the black belt stripe.
Arms (Make 2)
Hand (Yarn B: Skin Tone)
- Rnd 1: 6 sc in MR [6]
- Rnd 2: (inc) x6 [12]
- Rnd 3-4: sc in each st around [12]
- Rnd 5: (dec) x3, 6 sc [9]
Stuff hand lightly.
- Rnd 6: Change to Yarn D (White). (sc, dec) x3 [6]
Cuff (Yarn D: White)
- Rnd 7-8: sc in each st around [6]
Arm (Yarn C: Red)
- Rnd 9: Change to Yarn C (Red). (inc) x6 [12]
- Rnd 10-12: sc in each st around [12]
FO, leaving a long tail for sewing. Stuff arm lightly.
Legs & Shoes (Make 2)
Shoes (Yarn E: Green)
- Rnd 1: Ch 5. Sc in 2nd ch from hook, 2 sc, 3 sc in last ch. Continue on other side of chain: 2 sc, inc in last st [10]
- Rnd 2: inc, 2 sc, (inc) x3, 2 sc, (inc) x2 [16]
- Rnd 3: sc in each st around [16]
- Rnd 4: 4 sc, (dec) x4, 4 sc [12]
Stuff shoe firmly.
- Rnd 5: 3 sc, (dec) x3, 3 sc [9]
Pants (Yarn C: Red)
- Rnd 6: Change to Yarn C (Red). sc in each st around [9]
- Rnd 7-10: sc in each st around [9]
FO, leaving a long tail for sewing. Stuff leg firmly.
Santa Hat (Yarn C: Red and Yarn D: White)
Start with Yarn C (Red)
- Rnd 1: 6 sc in MR [6]
- Rnd 2: sc in each st around [6]
- Rnd 3: (sc, inc) x3 [9]
- Rnd 4: sc in each st around [9]
- Rnd 5: (2 sc, inc) x3 [12]
- Rnd 6: sc in each st around [12]
- Rnd 7: (3 sc, inc) x3 [15]
- Rnd 8: sc in each st around [15]
- Rnd 9: (4 sc, inc) x3 [18]
- Rnd 10: sc in each st around [18]
- Rnd 11: (5 sc, inc) x3 [21]
- Rnd 12: Change to Yarn D (White). sc in each st around [21]
FO, leaving a long tail. Add a small white pompom to the tip of the hat. Sew hat onto Mickey’s head, slightly angled.
Candy Cane (Yarn C: Red and Yarn D: White)
- Using Red and White yarn, ch 15. Hold both strands together, sc in 2nd ch from hook and across. [14]
Twist the two colors around each other as you work or after. Bend into a candy cane shape and secure with a stitch. Sew to one of Mickey’s hands.
Assembly:
- Sew head to body.
- Sew arms to the sides of the body, just below the collar.
- Sew legs to the bottom of the body.
- Sew ears to the head.
- Sew nose to the face.
- Embroider a small white highlight on the eyes if desired, and black smile and eyebrows.
- Attach the Santa hat to the head.
- Sew the candy cane to one of Mickey’s hands.