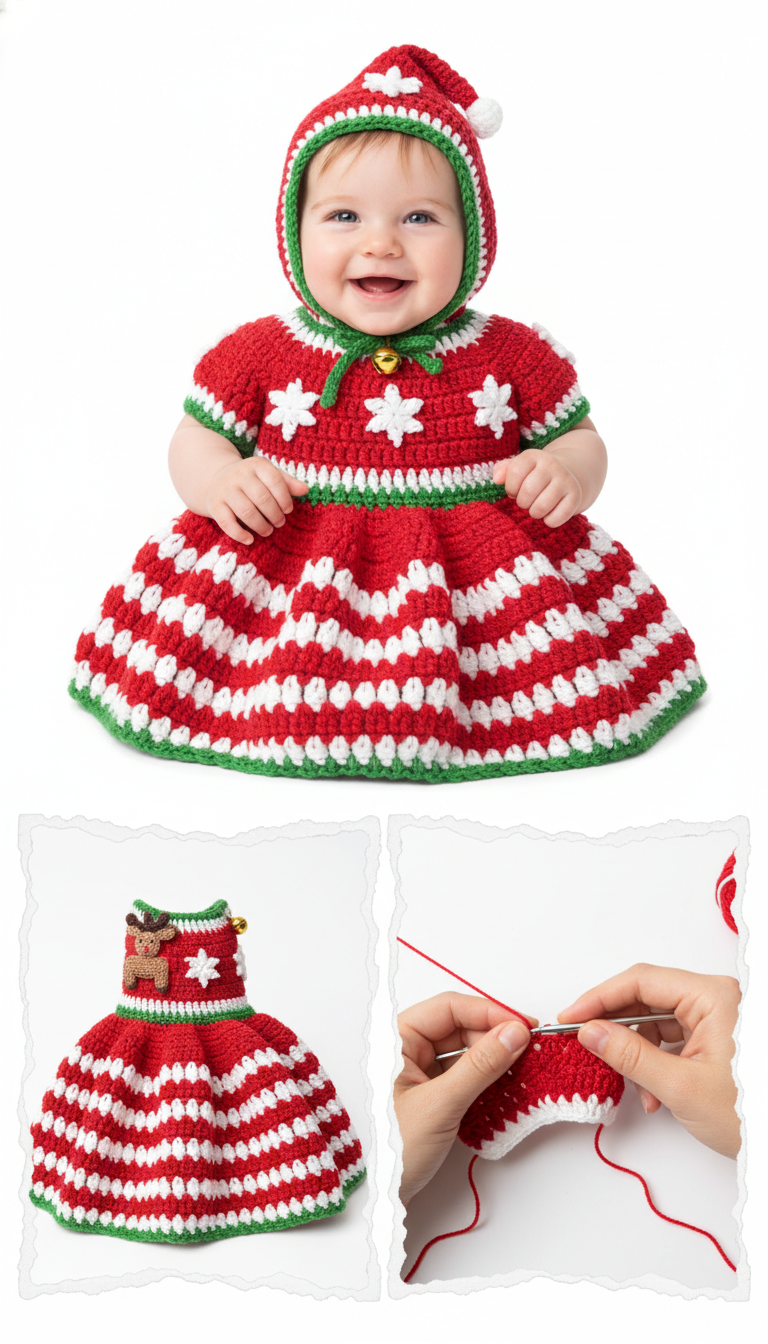
Get ready to create the most enchanting outfit for your little one this holiday season! This delightful crochet Christmas baby dress and matching hat pattern features festive red and white stripes, vibrant green accents, and charming white snowflake appliqués. It’s the perfect project to add a touch of handmade magic to your baby’s first Christmas photos or festive gatherings.
Craft a Cherished Keepsake: Why You’ll Love This Holiday Crochet Project
Handmaking a special outfit like this creates not just a garment, but a treasured memory. Imagine the joy of seeing your baby dressed in your handcrafted creation, spreading smiles and capturing hearts. This pattern is designed to be clear and rewarding, allowing you to pour love into every stitch and create a truly unique and heartwarming gift that will be cherished for years to come.
Crochet Pattern: Spread Holiday Cheer with This Adorable Crochet Christmas Baby Dress and Hat Pattern!
Materials
- Worsted weight yarn in Red (MC)
- Worsted weight yarn in White (CC1)
- Worsted weight yarn in Christmas Green (CC2)
- Crochet hook 4.0mm (G/6)
- Yarn needle
- Scissors
- 2 small gold bells
- White yarn for pom-pom (optional, or pom-pom maker)
Abbreviations
- ch: chain
- sl st: slip stitch
- sc: single crochet
- hdc: half double crochet
- dc: double crochet
- inc: increase (2 stitches in same stitch)
- st(s): stitch(es)
- sk: skip
- FO: finish off
- rep: repeat
- MC: Main Color (Red)
- CC1: Contrasting Color 1 (White)
- CC2: Contrasting Color 2 (Green)
Instructions
Gauge: 4 hdc x 3 rows = 1 inch (adjust hook size if necessary to achieve desired gauge)
This pattern is sized for approximately 6-12 months.
Dress
Yoke (MC – Red)
- Row 1: Ch 46. Hdc in 2nd ch from hook and in each ch across. (45 hdc). Turn.
- Row 2: Ch 1, 2 hdc in first st (inc), hdc in next 6 sts, 2 hdc in next st (inc), hdc in next 9 sts, 2 hdc in next st (inc), hdc in next 9 sts, 2 hdc in next st (inc), hdc in next 6 sts, 2 hdc in last st (inc). (50 hdc). Turn.
- Row 3: Ch 1, hdc in each st across. (50 hdc). Turn.
- Row 4: Ch 1, 2 hdc in first st, hdc in next 7 sts, 2 hdc in next st, hdc in next 10 sts, 2 hdc in next st, hdc in next 10 sts, 2 hdc in next st, hdc in next 7 sts, 2 hdc in last st. (55 hdc). Turn.
- Row 5: Ch 1, hdc in each st across. (55 hdc). Join with sl st to first hdc to form a round. From this point, work in continuous rounds.
- Round 6: Ch 1, (hdc in next 9 sts, inc in next st) rep 5 times, hdc in last 5 sts. (60 hdc).
Separate Sleeves and Bodice
- Round 7: Ch 1, hdc in first 8 sts (front panel), ch 3, sk next 14 sts (first armhole), hdc in next 16 sts (back panel), ch 3, sk next 14 sts (second armhole), hdc in next 8 sts (front panel). Join with sl st to first hdc. (32 hdc, 6 ch).
- Round 8: Ch 1, hdc in each hdc and in each ch around. Join with sl st. (38 hdc).
- Rounds 9-12: Ch 1, hdc in each st around. Join with sl st. (38 hdc).
Start Skirt (MC – Red)
- Round 13: Ch 2 (counts as first dc), dc in same st, dc in each st around. Join with sl st to top of ch 2. (38 dc).
- Round 14: Ch 2, 2 dc in same st, (dc in next st, 2 dc in next st) rep around. Join with sl st. (57 dc).
- Round 15 (CC1 – White): Ch 2, dc in same st, (dc in next 2 sts, 2 dc in next st) rep around. Join with sl st. (76 dc). Change to CC1.
- Round 16 (CC1 – White): Ch 2, dc in each st around. Join with sl st. (76 dc). Change to MC.
- Round 17 (MC – Red): Ch 2, dc in each st around. Join with sl st. (76 dc).
- Round 18 (MC – Red): Ch 2, (dc in next 3 sts, 2 dc in next st) rep around. Join with sl st. (95 dc).
- Rounds 19-20 (CC1 – White): Rep Rounds 15-16 pattern (change to white for 2 rounds, increasing in the first round to keep the same increase ratio if desired, or keep as 95 dc if enough flare). For simpler stripes, keep the st count consistent for a few rounds. Let’s make it simpler for the stripes.
- Stripes (Repeat 2 rounds per color):
- Round 15 (CC1 – White): Ch 2, dc in each st around. Join with sl st. (57 dc). Change to MC.
- Round 16 (MC – Red): Ch 2, (dc in next 2 sts, 2 dc in next st) rep around. Join with sl st. (76 dc). Change to CC1.
- Round 17 (CC1 – White): Ch 2, dc in each st around. Join with sl st. (76 dc). Change to MC.
- Round 18 (MC – Red): Ch 2, (dc in next 3 sts, 2 dc in next st) rep around. Join with sl st. (95 dc). Change to CC1.
- Round 19 (CC1 – White): Ch 2, dc in each st around. Join with sl st. (95 dc). Change to MC.
- Round 20 (MC – Red): Ch 2, (dc in next 4 sts, 2 dc in next st) rep around. Join with sl st. (114 dc). Change to CC1.
- Round 21 (CC1 – White): Ch 2, dc in each st around. Join with sl st. (114 dc). Change to MC.
- Round 22 (MC – Red): Ch 2, (dc in next 5 sts, 2 dc in next st) rep around. Join with sl st. (133 dc). Change to CC1.
- Round 23 (CC1 – White): Ch 2, dc in each st around. Join with sl st. (133 dc). Change to MC.
- Round 24 (MC – Red): Ch 2, (dc in next 6 sts, 2 dc in next st) rep around. Join with sl st. (152 dc). Change to CC1.
- Round 25 (CC1 – White): Ch 2, dc in each st around. Join with sl st. (152 dc). Change to CC2.
- Round 26 (CC2 – Green): Ch 1, sc in each st around. Join with sl st. FO.
Sleeves (MC – Red)
- Attach MC yarn to the bottom of one armhole.
- Round 1: Ch 1, hdc evenly around the armhole opening and into the 3 ch sts. Join with sl st. (Approx. 20-22 hdc).
- Rounds 2-4: Ch 1, hdc in each st around. Join with sl st.
- Round 5 (CC2 – Green): Ch 1, sc in each st around. Join with sl st. FO.
- Rep for second sleeve.
Neckline Trim (CC2 – Green)
- Attach CC2 yarn to the back of the neckline. Ch 1, sc evenly around the entire neckline. Join with sl st. FO.
White Snowflake Appliqués (CC1 – White)
Make 3-5 snowflakes (or desired number for dress and hat).
- Round 1: Start with a magic ring, ch 1, 6 sc into ring. Join with sl st to first sc. (6 sc).
- Round 2: Ch 3 (counts as dc and ch 1), (dc, ch 1) into first st, (dc, ch 1, dc, ch 1) into each of the next 5 sc. Join with sl st to 2nd ch of beginning ch 3. (12 dc, 12 ch-1 spaces).
- Round 3: Sl st into first ch-1 space. Ch 1, (sc in ch-1 space, ch 3, sl st in 2nd ch from hook (picot made), sc in same ch-1 space, sk next dc) rep around. Join with sl st to first sc. FO, leaving a long tail for sewing.
- Sew snowflakes onto the bodice of the dress as shown in the image.
Hat
Crown (MC – Red)
- Round 1: Start with a magic ring, ch 2 (counts as first hdc), 9 hdc into ring. Join with sl st to top of ch 2. (10 hdc).
- Round 2: Ch 2, hdc in same st, 2 hdc in each st around. Join with sl st. (20 hdc).
- Round 3: Ch 2, hdc in same st, (hdc in next st, 2 hdc in next st) rep around. Join with sl st. (30 hdc).
- Round 4: Ch 2, hdc in same st, (hdc in next 2 sts, 2 hdc in next st) rep around. Join with sl st. (40 hdc).
- Round 5: Ch 2, hdc in same st, (hdc in next 3 sts, 2 hdc in next st) rep around. Join with sl st. (50 hdc).
- Round 6: Ch 2, hdc in same st, (hdc in next 4 sts, 2 hdc in next st) rep around. Join with sl st. (60 hdc).
Hat Body (MC – Red)
- Rounds 7-15: Ch 2, hdc in each st around. Join with sl st. (60 hdc).
Hat Brim/Face Opening (CC2 – Green)
- Round 16 (CC2 – Green): Ch 1, sc in each st around. Join with sl st. FO.
Hat Ties (CC2 – Green)
- Cut two strands of CC2 yarn, approx 15-18 inches each. Attach one strand to the bottom edge of the hat on one side of the face opening, and the other strand on the opposite side.
- Braid or chain a tie from each strand. Attach a small gold bell to the end of each tie.
White Pom-pom
- Make a small white pom-pom (approx 1 inch diameter) and securely attach it to the very top tip of the hat.
White Snowflake Appliqué
- Make one snowflake using the same pattern as for the dress. Sew it onto the front of the hat.