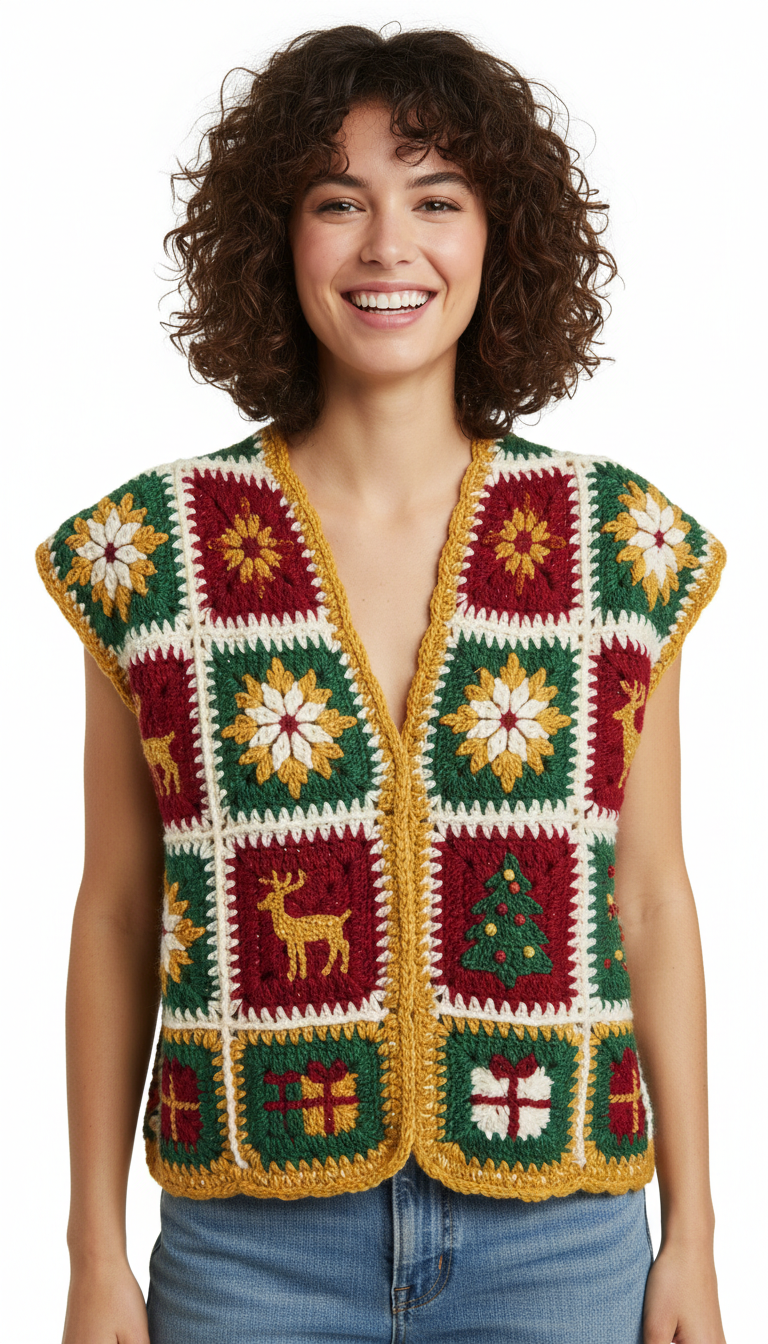
Embrace the festive spirit with this charming crochet granny square vest! Perfect for holiday gatherings or adding a touch of cheer to your everyday wardrobe, this unique piece features delightful Christmas motifs like reindeer, trees, and snowflakes. It’s a joyful project for intermediate crocheters looking to create a memorable, handmade garment.
Craft Your Own Cozy Holiday Statement Piece
There’s nothing quite like a handmade garment to make a statement, especially during the holidays. This festive vest allows you to infuse your personal style and love for crochet into a wearable piece of art. It’s a wonderful way to express your creativity, spread holiday cheer, and enjoy the comfort of a unique, custom-made addition to your wardrobe.
Crochet Pattern: Stitch the Holidays: Festive Granny Square Christmas Vest Crochet Pattern
Materials
- Worsted weight yarn in Dark Red (Burgundy)
- Worsted weight yarn in Forest Green
- Worsted weight yarn in Cream (Off-White)
- Worsted weight yarn in Mustard Yellow (Gold)
- Crochet Hook size H/8 (5.0 mm)
- Tapestry needle
- Scissors
- 3-4 buttons (approx. 0.75-1 inch diameter)
Abbreviations
- ch – chain
- sl st – slip stitch
- sc – single crochet
- dc – double crochet
- sp – space
- sk – skip
- rep – repeat
- st(s) – stitch(es)
Instructions
Gauge: Each completed granny square should measure approximately 4×4 inches. Adjust hook size if necessary.
Note on Motifs: The vest is constructed using individual granny squares. Some squares are solid colors, while others feature intricate Christmas motifs (reindeer, Christmas tree, gift box, snowflake). These motifs are created using tapestry crochet or intarsia methods, changing colors within the double crochet clusters. While a detailed chart for each motif is beyond the scope of this text-based pattern, you can find numerous online resources for granny square motif charts to replicate these designs, or simply create solid-color squares in the specified colors and add embroidered motifs later.
Granny Square Base Pattern (Make various quantities in different colors and motifs)
- Start: With your desired color, ch 4, sl st to first ch to form a ring.
- Round 1: Ch 3 (counts as first dc), 2 dc into ring, ch 2. *3 dc into ring, ch 2*. Rep from * two more times. Sl st to top of beg ch 3. (4 ‘3-dc clusters’, 4 ch-2 corner spaces)
- Round 2: Ch 3 (counts as first dc), (2 dc, ch 2, 3 dc) into first ch-2 sp (corner made). Ch 1. *(3 dc, ch 2, 3 dc) into next ch-2 sp (corner made). Ch 1.* Rep from * two more times. Sl st to top of beg ch 3. (8 ‘3-dc clusters’, 4 ch-2 corner spaces, 4 ch-1 spaces)
- Round 3: Ch 3 (counts as first dc), (2 dc, ch 2, 3 dc) into first ch-2 sp (corner made). Ch 1. 3 dc into next ch-1 sp. Ch 1. *(3 dc, ch 2, 3 dc) into next ch-2 sp (corner made). Ch 1. 3 dc into next ch-1 sp. Ch 1.* Rep from * two more times. Sl st to top of beg ch 3. Fasten off and weave in ends. (12 ‘3-dc clusters’, 4 ch-2 corner spaces, 8 ch-1 spaces)
Vest Construction
This vest is made of approximately 44-50 squares (adjust for desired size). The image shows a layout of roughly 4 columns wide and 5 rows deep for the main body, with front panels featuring V-neck shaping.
- Back Panel: Create a rectangle of joined squares. A typical size might be 4 squares wide by 5 squares tall (20 squares). Arrange your solid and motif squares as desired for the back.
- Front Panels (Make 2): For each front panel, create a section of squares that are roughly 2 squares wide. You’ll need to shape the V-neck. For example, for a 5-row tall vest, the bottom 3-4 rows might be 2 squares wide, and the top 1-2 rows might be 1 square wide, or you can gradually decrease as you join. Arrange your squares symmetrically for the front panels.
Joining Squares
Using Cream or Mustard Yellow yarn, join squares together with a slip stitch or single crochet through the back loops of the stitches on the edges. First, join all squares into rows, then join the rows together to form the back and front panels.
Assembling the Vest
- Shoulder Seams: Lay the back panel flat. Place the front panels on top, aligning the outer edges of the top squares with the back panel. Join the shoulder seams using slip stitch or single crochet with Mustard Yellow yarn. Leave the neck opening unjoined.
- Side Seams: Align the side edges of the front and back panels. Join the side seams from the bottom edge up to where you want the armhole opening to begin. Use slip stitch or single crochet with Mustard Yellow yarn.
Edging and Finishing
Using Mustard Yellow yarn for all edging:
- Bottom Hem: Attach yarn to any st on the bottom edge. Ch 1, then sc evenly around the entire bottom hem. Join with a sl st to the first sc. Ch 1, then work 1 round of reverse sc (crab stitch) or a simple sc border. Fasten off.
- Armhole Edging: Attach yarn to the bottom of one armhole. Ch 1, then sc evenly around the armhole opening. Join with a sl st to the first sc. Ch 1, then work 1 round of reverse sc or sc border. Fasten off. Repeat for the second armhole.
- Front Opening and Neckline Edging: Attach yarn to the bottom corner of one front panel. Ch 1, then sc evenly up the front opening, around the V-neckline, and down the other front opening to the bottom corner. Work an extra sc in each corner point of the V-neck for a smooth turn. Join with a sl st to the first sc.
- Button Band: On one of the front bands (choose left or right, depending on preference), work an additional 2-3 rows of sc. On the second or third row, create buttonholes by skipping 1-2 stitches and chaining 1-2 (adjust for button size) at evenly spaced intervals for your buttons.
- Final Border: After creating the buttonholes and button band, work one final round of reverse sc (crab stitch) or a simple sc border around the entire front opening and neckline for a clean finish.
- Buttons: Sew your chosen buttons onto the opposite front band, aligning them with the buttonholes.
Weave in all remaining loose ends. Block your vest gently if desired for a polished look.