Unlock a world of miniature charm with this adorable crochet wardrobe keychain pattern! Perfect for gifting or adding a unique touch to your keys or bag, this intricate design features tiny clothes, a working hanger, and even a little drawer. It’s a delightful project for those who love detailed amigurumi.
Craft Your Own Whimsical Mini Closet
Imagine carrying a little piece of handcrafted magic wherever you go. This miniature wardrobe isn’t just a keychain; it’s a conversation starter, a testament to your crochet skills, and a charming home for tiny garments. It makes an unforgettable personalized gift for fashion lovers or anyone who appreciates the art of amigurumi.
Crochet Pattern: Tiny Treasures: Crochet Miniature Wardrobe Keychain Pattern
Materials
- Light Blue (A) embroidery floss or very fine crochet thread
- White (B) embroidery floss or very fine crochet thread
- Scrap colors (C, D, E, F, G, H) of embroidery floss for clothes
- 0.75mm – 1.25mm crochet hook (or size suitable for your thread)
- Small amount of fiberfill
- Tapestry needle
- Scissors
- Keychain ring with chain
- Two tiny gold/brass beads (for door handles)
- One tiny gold/brass bead (for drawer handle)
- Thin wire or wooden skewer piece (for hanger rod)
- Small piece of craft wire (for miniature hanger)
Abbreviations
- ch – chain
- sc – single crochet
- sl st – slip stitch
- st(s) – stitch(es)
- FO – fasten off
- inc – increase (2 sc in one st)
Instructions
Gauge: Not crucial for this project, but aim for a tight fabric to prevent stuffing from showing through. Your finished wardrobe will be approximately 4-5 cm tall.
Note: Work in continuous rounds/rows unless otherwise specified. Use a stitch marker if working in rounds.
Wardrobe Panels (Make with Light Blue A)
Back Panel (Make 1):
- Ch 21.
- Row 1: Sc in 2nd ch from hook and across (20 sc). Ch 1, turn.
- Rows 2-25: Sc in each st across (20 sc). Ch 1, turn.
- FO, leaving a long tail for sewing.
Side Panels (Make 2):
- Ch 11.
- Row 1: Sc in 2nd ch from hook and across (10 sc). Ch 1, turn.
- Rows 2-25: Sc in each st across (10 sc). Ch 1, turn.
- FO, leaving long tails for sewing.
Top & Bottom Panels (Make 2):
- Ch 21.
- Row 1: Sc in 2nd ch from hook and across (20 sc). Ch 1, turn.
- Rows 2-11: Sc in each st across (20 sc). Ch 1, turn.
- FO, leaving long tails for sewing.
Internal Shelf (Make 1):
- Ch 19.
- Row 1: Sc in 2nd ch from hook and across (18 sc). Ch 1, turn.
- Rows 2-3: Sc in each st across (18 sc). Ch 1, turn.
- FO.
Wardrobe Doors (Make with Light Blue A)
Door Panels (Make 2):
- Ch 9.
- Row 1: Sc in 2nd ch from hook and across (8 sc). Ch 1, turn.
- Rows 2-20: Sc in each st across (8 sc). Ch 1, turn.
- FO, leaving a tail for sewing.
Drawer Front (Make with Light Blue A)
- Ch 21.
- Row 1: Sc in 2nd ch from hook and across (20 sc). Ch 1, turn.
- Rows 2-6: Sc in each st across (20 sc). Ch 1, turn.
- FO, leaving a tail for sewing.
Miniature Clothing (Scrap Colors)
Striped Dress (Colors C, D, E, F, G, H):
- Using Color C, ch 8.
- Row 1: Sc in 2nd ch from hook and across (7 sc). Ch 1, turn.
- Change to Color D.
- Rows 2-7: Sc in each st across, changing color every row (e.g., D, E, F, G, H, C). Ch 1, turn. (7 sc).
- Armholes (Optional, for shaping): Fold dress in half lengthwise. Sl st 2 sts together from row 7 on each side to create small armholes.
- FO, leaving a small tail for attaching to hanger.
Folded Clothes (Colors C, D, E – Make 3-4):
- Using Color C, ch 5.
- Row 1: Sc in 2nd ch from hook and across (4 sc). Ch 1, turn.
- Rows 2-4: Sc in each st across (4 sc). Ch 1, turn.
- FO. Repeat with Colors D and E. Fold into tiny squares.
Assembly
1. Construct the Wardrobe Box: Using the long tails from the blue panels and your tapestry needle, whip stitch or sl st the panels together. Start by sewing the side panels to the back panel. Then sew the top and bottom panels. Insert a small amount of fiberfill to give the structure stability before fully closing. Position the internal shelf about halfway down the back panel and sew it in place. Make sure to leave the front open.
2. Add White Trim (B): Once the blue box is assembled, join White (B) yarn to any corner of the open front edge. Sc evenly around the entire front opening of the wardrobe (including the internal shelf edge). Sl st to first sc. Repeat for the edges of the two door panels and the drawer front panel.
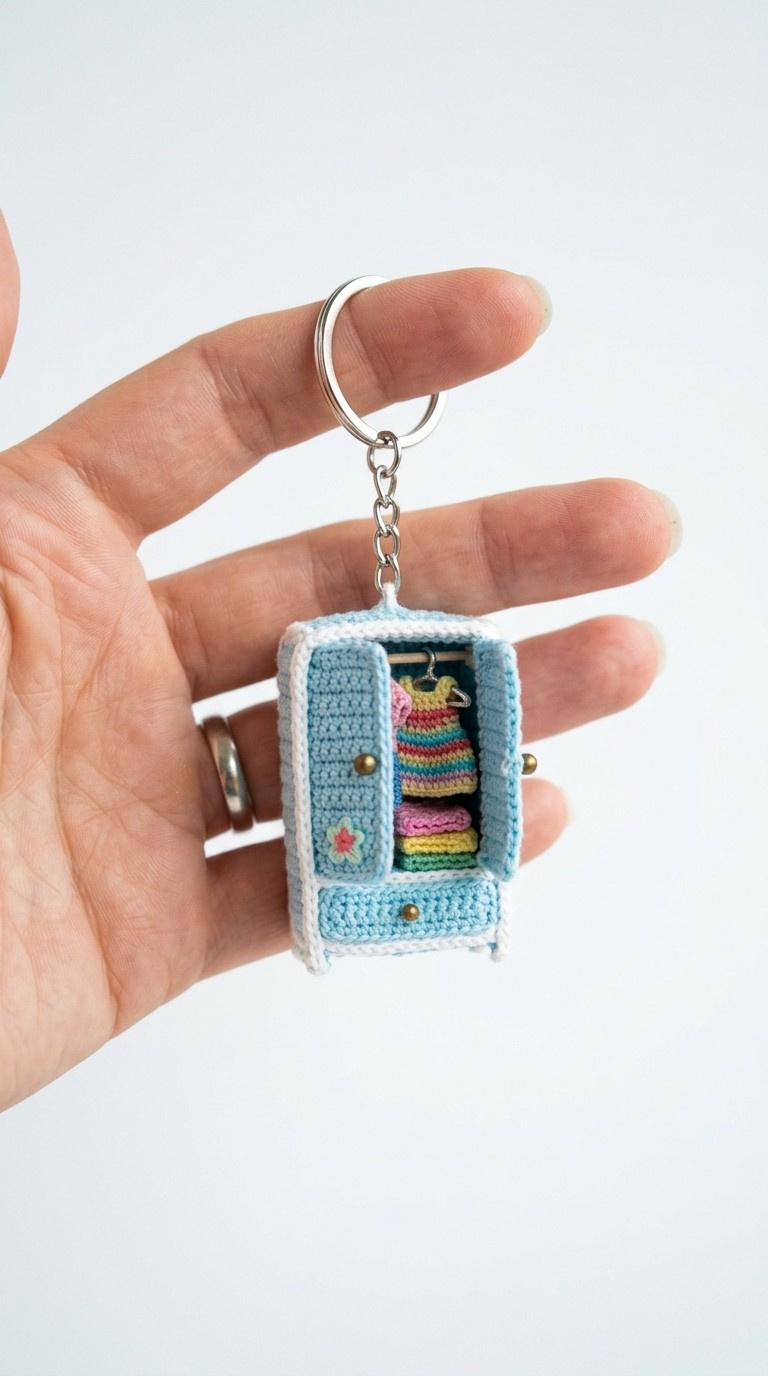
3. Attach Doors: Position the door panels on the front opening. Using White (B) yarn, sew one side of each door to the front edge of the wardrobe opening, creating a hinge effect that allows them to open and close. Alternatively, you can sew them static in an open position as shown in the image.
4. Attach Drawer Front: Position the drawer front panel at the bottom of the wardrobe opening. Using White (B) yarn, sew the drawer front to the bottom edge of the wardrobe, making it a decorative, non-functional drawer.
5. Add Handles: Using a thin needle and thread, sew a tiny gold/brass bead onto the outer edge of each door panel and one onto the center of the drawer front for handles.
6. Interior Details: Cut a small piece of thin wire or wooden skewer to fit horizontally across the inside of the wardrobe, just above the internal shelf. Glue or secure in place with a tiny dab of hot glue if needed. Create a miniature clothes hanger from craft wire. Hang the striped dress on it. Arrange the folded clothes on the internal shelf.
7. Keychain Attachment: Securely sew the keychain ring to the top center of the wardrobe using a strong thread.
8. Finishing Touches (Optional Flower): Using pink (C) and green (D) floss, embroider a tiny flower onto the bottom left corner of one door panel, as seen in the image.