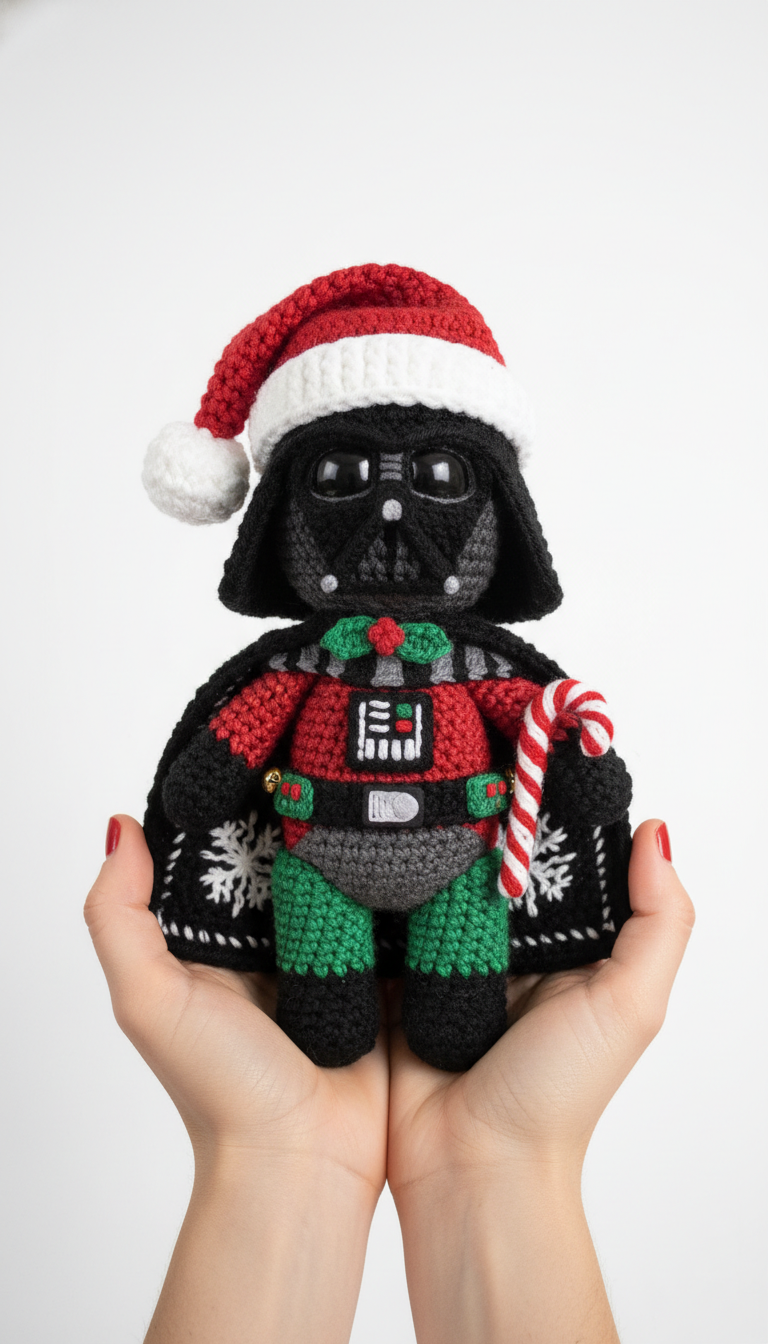
Get ready to command the holiday spirit with this unique Santa Darth Vader Amigurumi! This fun crochet project merges the dark side with festive cheer, creating an adorable, one-of-a-kind character perfect for Star Wars fans and Christmas enthusiasts alike. Bring a touch of intergalactic charm to your decorations or gift this festive villain to a loved one.
May the Holiday Force Be With Your Creations!
Imagine the delight of gifting this charming Santa Vader, a truly unique piece that stands out from typical holiday decor. It’s not just a crochet project; it’s a conversation starter, a personalized gift, and a fun way to celebrate your favorite sagas during the festive season. Embrace the challenge and create a truly memorable piece for your collection.
Crochet Pattern: Unleash the Holiday Force: Crochet Santa Darth Vader Amigurumi Pattern
Materials
- Black Worsted Weight Yarn
- Red Worsted Weight Yarn
- White Worsted Weight Yarn
- Green Worsted Weight Yarn
- Grey Worsted Weight Yarn
- 3.5mm Crochet Hook
- 10mm Safety Eyes (black)
- Polyester Fiberfill for stuffing
- Tapestry Needle
- Stitch Markers
- Small Jingle Bells (2)
- Craft Wire (optional, for candy cane shaping)
Abbreviations
- MR: Magic Ring
- ch: chain
- sc: single crochet
- inc: increase (2 sc in next stitch)
- dec: decrease (sc 2 together)
- sl st: slip stitch
- FO: Fasten Off
- BLO: Back Loop Only
- (…) x N: Repeat instructions in parentheses N times
- [N]: Total number of stitches at the end of the round
Instructions
Head (Black Yarn)
- R1: MR 6 sc [6]
- R2: inc in each sc [12]
- R3: (sc, inc) x 6 [18]
- R4: (2 sc, inc) x 6 [24]
- R5: (3 sc, inc) x 6 [30]
- R6: (4 sc, inc) x 6 [36]
- R7-R12: sc in each sc (6 rounds) [36]
- Insert 10mm safety eyes between R9 and R10, about 6-7 stitches apart.
- R13: (4 sc, dec) x 6 [30]
- R14: (3 sc, dec) x 6 [24]
- Start stuffing firmly.
- R15: (2 sc, dec) x 6 [18]
- R16: (sc, dec) x 6 [12]
- R17: dec x 6 [6]
- FO, close opening with tapestry needle.
Helmet Details (Black & Grey Yarn)
- Eye Sockets: Using black yarn and a tapestry needle, embroider two rectangular shapes above the safety eyes to outline the helmet’s eye sockets.
- Forehead Ridge: With black yarn, embroider a subtle horizontal ridge just above the eyes.
- Mouth/Grille: Using grey yarn, embroider a rectangular shape below the eyes. Then, with black yarn, embroider thin vertical lines within the grey rectangle to create the grille.
- Cheek Vents: With grey yarn, embroider two small square shapes on either side of the mouth grille.
Body (Starting Red, changing to Grey, Green, Black Yarn)
- R1: MR 6 sc (Red Yarn) [6]
- R2: inc in each sc [12]
- R3: (sc, inc) x 6 [18]
- R4: (2 sc, inc) x 6 [24]
- R5: (3 sc, inc) x 6 [30]
- R6: (4 sc, inc) x 6 [36]
- R7-R12: sc in each sc (6 rounds) [36]
- Change to Grey Yarn.
- R13-R14: sc in each sc (2 rounds) [36]
- Change to Green Yarn.
- R15-R16: sc in each sc (2 rounds) [36]
- R17: (4 sc, dec) x 6 [30]
- R18: (3 sc, dec) x 6 [24]
- Start stuffing.
- R19: (2 sc, dec) x 6 [18]
- R20: (sc, dec) x 6 [12]
- R21: dec x 6 [6]
- FO, close opening with tapestry needle. Stuff firmly.
Control Panel (on Red Body)
- Using Red, Green, White, and Black yarn, embroider the details onto the front center of the red section of the body, mimicking Darth Vader’s chest control panel. This typically involves a white rectangular base, with various smaller colored squares and lines.
Belt Details (on Grey Body)
- Using Grey yarn, embroider a rectangular buckle shape on the front center of the grey body section.
- Using Green yarn, embroider two small square shapes on either side of the buckle. Securely sew a small jingle bell onto each green square.
Arms (Make 2 – Red & Black Yarn)
- R1: MR 6 sc (Red Yarn) [6]
- R2-R5: sc in each sc (4 rounds) [6]
- Stuff lightly.
- Change to Black Yarn.
- R6-R9: sc in each sc (4 rounds) [6]
- FO, leaving a long tail for attaching. Do not stuff the black part.
Legs (Make 2 – Green & Black Yarn)
- R1: MR 6 sc (Green Yarn) [6]
- R2: inc in each sc [12]
- R3-R5: sc in each sc (3 rounds) [12]
- Stuff lightly.
- Change to Black Yarn.
- R6: sc in BLO in each sc [12] (This creates a slight ridge for the boot cuff)
- R7-R9: sc in each sc (3 rounds) [12]
- R10: (sc, dec) x 4 [8]
- FO, leaving a long tail for attaching. Finish stuffing the foot, flatten and sew opening closed.
Cape (Black & White Yarn)
- Ch 21 (Black Yarn)
- Row 1: sc in 2nd ch from hook and in each ch across. Ch 1, turn. [20]
- Row 2-15: sc in each sc. Ch 1, turn. [20]
- FO. Weave in ends.
- Snowflakes (White Yarn): Using white yarn and a tapestry needle, surface embroider various snowflake patterns onto the black cape, as depicted in the image.
Santa Hat (Red & White Yarn)
- R1: MR 4 sc (Red Yarn) [4]
- R2: (sc, inc) x 2 [6]
- R3: sc in each sc [6]
- R4: (2 sc, inc) x 2 [8]
- R5: sc in each sc [8]
- R6: (3 sc, inc) x 2 [10]
- R7: sc in each sc [10]
- R8: (4 sc, inc) x 2 [12]
- R9: sc in each sc [12]
- R10: (5 sc, inc) x 2 [14]
- R11: sc in each sc [14]
- R12: (6 sc, inc) x 2 [16]
- R13: sc in each sc [16]
- R14: (7 sc, inc) x 2 [18]
- R15: sc in each sc [18]
- Change to White Yarn.
- R16: sc in each sc [18] (This forms the brim)
- Sl st to first sc, FO. Weave in ends.
- Pom-Pom (White Yarn): Make a small white pom-pom (approx. 1.5-2 cm diameter) and securely attach it to the tip of the hat.
Candy Cane (Red & White Yarn)
- Using alternating Red and White yarn for stripes:
- R1: MR 6 sc [6]
- R2-R12: sc in each sc [6]
- FO. Weave in ends.
- Optionally, insert a piece of craft wire into the finished cane before bending to help it hold its shape. Bend into a classic candy cane ‘J’ shape.
Assembly
- Securely sew the Head to the top of the Body.
- Attach the Arms to the sides of the Body, just below the neck/shoulder area.
- Attach the Legs to the bottom of the Body.
- Drape the Cape over the shoulders of your Santa Vader. You can lightly tack it in place with a few stitches to secure.
- Place the Santa Hat on the Head. You can sew it in place or leave it removable.
- Sew the Candy Cane into one of the hands.
- Weave in any remaining loose ends.