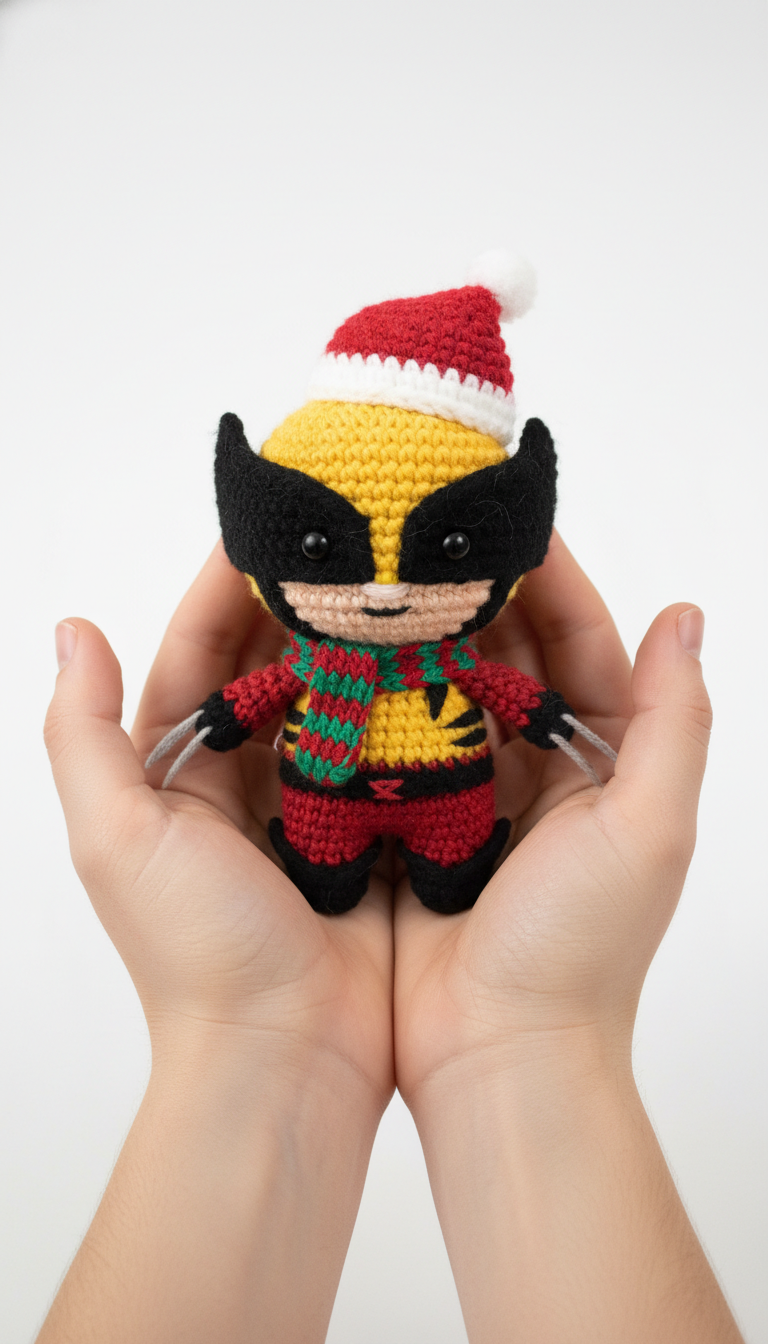
Get ready to merge your love for Marvel and the holiday spirit with this unique Christmas Wolverine Amigurumi pattern! This adorable, pint-sized Logan is decked out in festive gear, complete with a Santa hat and a striped scarf, making him the perfect handmade gift or a quirky addition to your holiday decor. Dive into this fun project and crochet your own merry mutant!
Craft the Ultimate Holiday Hero Gift
Imagine the delight on a Marvel fan’s face when they unwrap this custom-made Wolverine. This pattern guides you through creating a charming, detailed character that captures both the iconic fierceness of Wolverine and the joyful essence of Christmas. It’s not just a toy; it’s a personalized, cuddly tribute to a beloved hero, perfect for gifting or bringing a touch of mutant magic to your own festive celebrations.
Crochet Pattern: Unleash Your Inner Hero: Crochet a Festive Wolverine Amigurumi for the Holidays!
Materials
- Worsted weight yarn in Yellow, Black, Red, White, Green, Beige, Light Grey
- 2.5mm or 3.0mm crochet hook (adjust to your tension)
- Polyester fiberfill for stuffing
- 6mm or 8mm black safety eyes (2)
- Tapestry needle
- Stitch markers
- Scissors
Abbreviations
- MR: Magic Ring
- sc: single crochet
- inc: increase (2 sc in one stitch)
- dec: decrease (sc two stitches together)
- sl st: slip stitch
- ch: chain
- BLO: back loop only
- FO: Fasten off
Instructions
Gauge: Not crucial for this project, just ensure tight stitches to prevent stuffing from showing.
Note: Work in continuous rounds unless otherwise specified. Use a stitch marker to keep track of the first stitch of each round.
Head (Yellow)
- R1: With Yellow yarn, 6 sc in MR (6)
- R2: (inc) x6 (12)
- R3: (sc, inc) x6 (18)
- R4: (2 sc, inc) x6 (24)
- R5: (3 sc, inc) x6 (30)
- R6: (4 sc, inc) x6 (36)
- R7-R13: sc around (36) (7 rounds)
- R14: (4 sc, dec) x6 (30)
- R15: (3 sc, dec) x6 (24)
- Stuff head firmly.
- R16: (2 sc, dec) x6 (18)
- R17: (sc, dec) x6 (12)
- R18: (dec) x6 (6) FO, leave a long tail for sewing to body later.
Body (Red & Yellow)
- R1: With Red yarn, 6 sc in MR (6)
- R2: (inc) x6 (12)
- R3: (sc, inc) x6 (18)
- R4: (2 sc, inc) x6 (24)
- R5: (3 sc, inc) x6 (30)
- R6: sc around (30)
- R7: (4 sc, inc) x6 (36)
- R8-R10: sc around (36) (3 rounds)
- R11: (4 sc, dec) x6 (30)
- R12: sc around (30)
- R13: (3 sc, dec) x6 (24)
- R14: sc around (24) (Red for pants)
- R15: Change to Yellow yarn. sc around (24)
- R16-R19: sc around (24) (4 rounds Yellow for chest)
- R20: (2 sc, dec) x6 (18) FO, leave a long tail for sewing to head. Stuff body firmly.
Mask (Black)
- With Black yarn, ch 17.
- Row 1: Sc in 2nd ch from hook, sc in next 15 ch (16 sc)
- Row 2-3: Ch 1, turn, sc across (16 sc)
- Row 4: Ch 1, turn, sk next st, sc in next 14 st, sk last st (14 sc)
- Row 5-6: Ch 1, turn, sc across (14 sc)
- Row 7: Ch 1, turn, sk next st, sc in next 12 st, sk last st (12 sc)
- Row 8-9: Ch 1, turn, sc across (12 sc)
- FO.
- To create mask ‘wings’: Attach Black yarn to the side of Row 1. Ch 5, sc in 2nd ch from hook, sc in next 3 ch. Sl st into the side of the mask to secure. Repeat on the other side.
Ears (Black) – Make 2
- R1: With Black yarn, 4 sc in MR (4)
- R2: (sc, inc) x2 (6)
- R3: (2 sc, inc) x2 (8)
- FO, leave a tail for sewing. Flatten and pinch opening shut.
Arms (Red & Black) – Make 2
- R1: With Red yarn, 6 sc in MR (6)
- R2-R5: sc around (6) (4 rounds Red)
- R6: Change to Black yarn (for cuff). sc around (6)
- R7: sc around (6)
- FO, leave a long tail for sewing. Stuff lightly.
Legs & Boots (Red & Black) – Make 2
Start with Boot (Black)
- R1: With Black yarn, 6 sc in MR (6)
- R2: (inc) x6 (12)
- R3: (sc, inc) x6 (18)
- R4: sc in BLO (18)
- R5-R6: sc around (18)
- R7: (dec, 7 sc) x2 (16)
- Stuff boot firmly.
Continue with Leg (Red)
- R8: Change to Red yarn. sc around (16)
- R9: (dec, 6 sc) x2 (14)
- R10-R12: sc around (14) (3 rounds Red)
- R13: (dec, 5 sc) x2 (12)
- R14: sc around (12)
- FO, leave a long tail for sewing. Stuff leg firmly.
Santa Hat (Red & White)
- R1: With Red yarn, 6 sc in MR (6)
- R2: sc around (6)
- R3: (sc, inc) x3 (9)
- R4: sc around (9)
- R5: (2 sc, inc) x3 (12)
- R6: sc around (12)
- R7: (3 sc, inc) x3 (15)
- R8: sc around (15)
- R9: (4 sc, inc) x3 (18)
- R10: sc around (18)
- R11: (5 sc, inc) x3 (21)
- R12: sc around (21)
- R13: (6 sc, inc) x3 (24)
- R14: sc around (24)
- R15: Change to White yarn (for brim). sc around (24)
- R16: sc around (24)
- FO. Weave in ends. Make a small white pom-pom and sew to the tip of the hat.
Scarf (Green & Red)
- With Green yarn, ch 40.
- Row 1: Sc in 2nd ch from hook and across (39 sc)
- Row 2: Ch 1, turn, sc across (Green)
- Row 3: Change to Red yarn. Ch 1, turn, sc across (39 sc)
- Row 4: Ch 1, turn, sc across (Red)
- Row 5: Change to Green yarn. Ch 1, turn, sc across (39 sc)
- Row 6: Ch 1, turn, sc across (Green)
- Row 7: Change to Red yarn. Ch 1, turn, sc across (39 sc)
- Row 8: Ch 1, turn, sc across (Red)
- Row 9: Change to Green yarn. Ch 1, turn, sc across (39 sc)
- Row 10: Ch 1, turn, sc across (Green)
- FO. Weave in ends.
Claws (Light Grey)
- Cut 6 strands of Light Grey yarn, each about 4-5cm long.
- For each arm, thread 3 strands through the end of the black cuff, positioning them to protrude like claws. Knot securely inside the arm. Trim to desired length. (Optional: Stiffen with a dab of fabric glue if desired).
Assembly
- Sew the Body to the bottom of the Head, ensuring the yellow chest aligns.
- Sew the Mask onto the Head, positioning it as seen in the image, allowing the yellow forehead to show above, and the lower face area to be exposed below.
- Attach the Black Ears to the top sides of the head, slightly behind the mask’s ‘wings’.
- Insert the safety eyes into the black mask where the eyes should be, or embroider eyes with black yarn.
- With Beige yarn, embroider a small oval shape on the exposed yellow part of the face, for the lower face.
- Embroider a small nose and a curved smile onto the beige face with Black yarn.
- Using Black yarn, embroider the distinct three stripe markings onto the yellow chest area of the body (as seen in the image).
- With Red yarn, embroider a small ‘X’ or buckle detail onto the front of the red pants.
- Sew the Arms to the sides of the yellow chest, just below the neck.
- Sew the Legs to the bottom of the red pants, ensuring even spacing.
- Place the Santa Hat on Wolverine’s head.
- Wrap the striped Scarf around his neck.