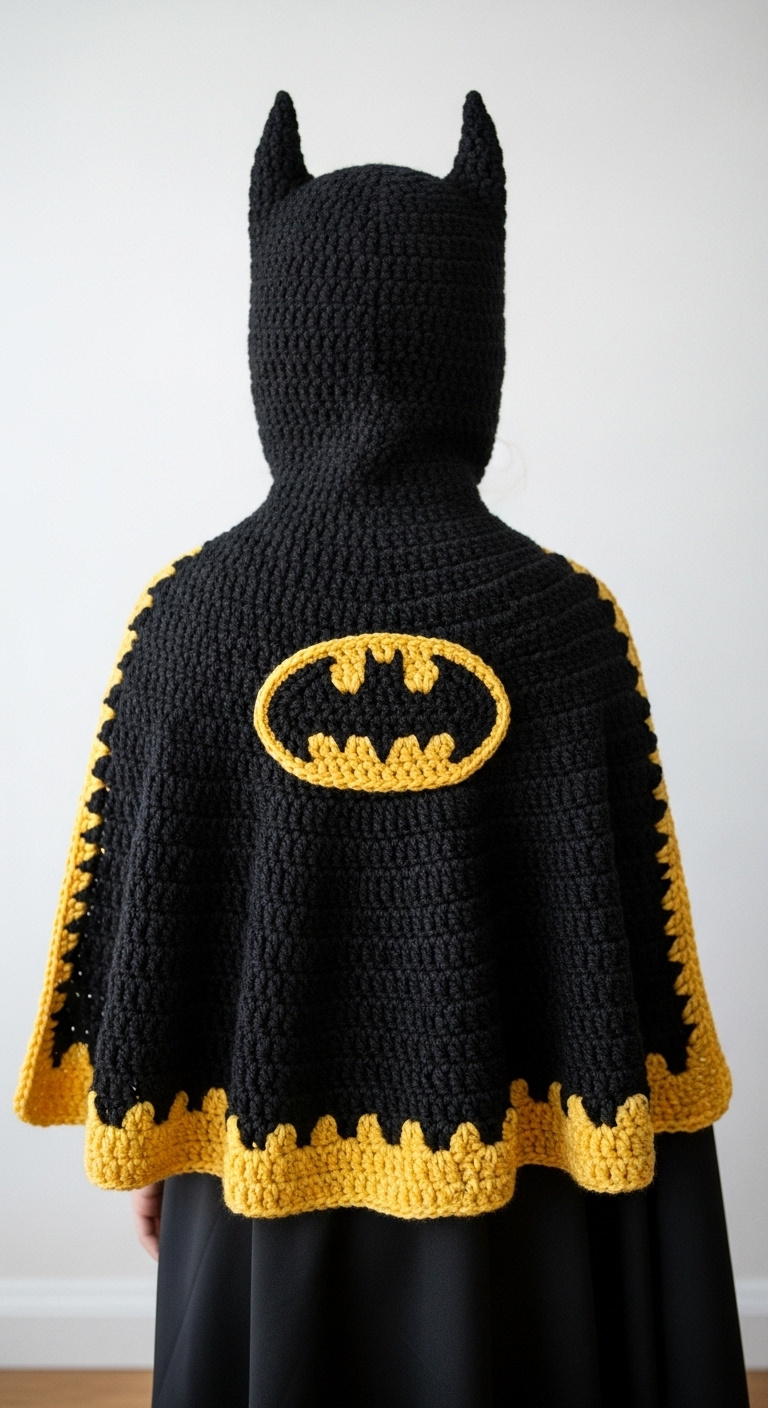
Transform into the legendary Caped Crusader with this incredible crochet hooded Batman cape! Perfect for dress-up, Halloween, or simply channeling your favorite superhero, this pattern guides you through creating a striking black cape with iconic yellow accents and the unmistakable Batman symbol. Get ready to craft a piece that will make any fan feel like a true hero.
Craft a Heroic Statement with This Unique Crochet Project
Beyond just a costume, this crochet hooded Batman cape is a fantastic way to express creativity and passion for pop culture. It makes a thoughtful handmade gift for any Batman enthusiast, young or old, and offers a rewarding challenge for crocheters of all skill levels. Embrace the cowl and create a truly custom piece that stands out.
Crochet Pattern: Unleash Your Inner Hero: The Ultimate Crochet Hooded Batman Cape Pattern
Materials
- Worsted weight yarn in Black (approx. 400-500 yards)
- Worsted weight yarn in Bright Yellow (approx. 100-150 yards)
- Crochet Hook G/6 (4.0 mm)
- Yarn needle
- Scissors
- Stitch markers (optional)
Abbreviations
- ch: chain
- sl st: slip stitch
- sc: single crochet
- inc: increase (2 sc in same st)
- dec: decrease (sc2tog)
- dc: double crochet
- R: Row/Round
- st(s): stitch(es)
- FO: Fasten off
Instructions
Part 1: The Hood (Black Yarn)
Using Black yarn and G/6 (4.0 mm) hook:
- Starting at Face Opening:
- Ch 65 (adjust for desired face opening circumference, aiming for a snug but comfortable fit). Sl st to first ch to form a large ring, being careful not to twist.
- R1: Ch 1, sc in each ch around. (65 sc) Sl st to first sc.
- R2-15: Ch 1, sc in each st around. (65 sc) Sl st to first sc. (Work until desired depth from face to back of head is reached, approximately 5-6 inches for a child’s head.)
- Now we will begin shaping the back of the head.
- R16: Ch 1, sc in first 30 sts, sc2tog, sc in next st, sc2tog, sc in remaining sts to end of round. (63 sc) Sl st to first sc.
- R17-20: Ch 1, sc in each st around. (63 sc) Sl st to first sc.
- R21: Ch 1, sc in first 28 sts, (sc2tog) 3 times, sc in remaining sts to end of round. (57 sc) Sl st to first sc.
- Continue decreasing gradually at the back of the head over the next few rounds until the opening at the top is closed. A possible sequence could be:
- R22: Ch 1, sc in each st around. (57 sc)
- R23: Ch 1, sc in 26 sts, (sc2tog) 3 times, sc in remaining sts. (51 sc)
- R24: Ch 1, sc in each st around. (51 sc)
- R25: Ch 1, sc in 24 sts, (sc2tog) 3 times, sc in remaining sts. (45 sc)
- R26: Ch 1, sc in each st around. (45 sc)
- R27: Ch 1, sc in 22 sts, (sc2tog) 3 times, sc in remaining sts. (39 sc)
- R28: Ch 1, sc in each st around. (39 sc)
- R29: Ch 1, (sc2tog) 19 times, sc in last st. (20 sc)
- R30: Ch 1, (sc2tog) 10 times. (10 sc)
- Pull yarn through remaining stitches and gather to close. FO. Weave in ends.
- Ears (Make 2, Black Yarn):
- Ch 2.
- R1: Sc in 2nd ch from hook. Turn. (1 sc)
- R2: Ch 1, 3 sc in st. Turn. (3 sc)
- R3: Ch 1, sc in each st across. Turn. (3 sc)
- R4: Ch 1, inc, sc in next st, inc. Turn. (5 sc)
- R5: Ch 1, sc in each st across. Turn. (5 sc)
- R6: Ch 1, inc, sc in next 3 sts, inc. Turn. (7 sc)
- R7-8: Ch 1, sc in each st across. Turn. (7 sc)
- Sl st around the edges of the ear to give it a neat finish. FO, leaving a long tail for sewing.
- Sew ears securely to the top of the hood, slightly towards the front.
Part 2: The Cape (Black Yarn)
Attach Black yarn to the bottom edge of the hood (the original starting chain edge – 65 sts if you followed the hood instructions). Work in continuous rounds, or sl st at end of each round.
- R1: Ch 1, sc in each st around. (65 sc) Sl st to first sc.
- R2: Ch 1, *sc in next 4 sts, inc in next st*. Repeat around. (approx. 78 sc) Sl st to first sc.
- R3: Ch 1, *sc in next 5 sts, inc in next st*. Repeat around. (approx. 91 sc) Sl st to first sc.
- R4: Ch 1, *sc in next 6 sts, inc in next st*. Repeat around. (approx. 104 sc) Sl st to first sc.
- Continue increasing in this manner, adding one more sc between increases each round. Work for approximately 20-25 rounds for a child’s cape, or until desired length is reached, ensuring the cape flares out smoothly.
- FO.
Part 3: Yellow Edging and Scalloped Border (Yellow Yarn)
- Face Opening Edging:
- Attach Yellow yarn to any st around the face opening of the hood. Ch 1, sc evenly around the entire face opening. Sl st to first sc. FO.
- Cape Front Edging:
- Attach Yellow yarn to the bottom of one front opening of the cape. Ch 1, sc evenly up the raw edge of the cape to the hood, around the back of the hood’s neck edge, and down the other front opening. This creates a neat border for the opening. Sl st to first sc. FO.
- Scalloped Cape Border:
- Attach Yellow yarn to any st along the bottom edge of the cape.
- R1 (Scallop): Ch 1, *sc in next st, skip 2 sts, 5 dc in next st (this forms a shell), skip 2 sts*. Repeat from * around the entire bottom edge of the cape. Adjust skips and shells at the end if necessary to make it even. Sl st to first sc. FO.
Part 4: Batman Logo Appliqué (Yellow Yarn)
The logo consists of a yellow oval base and a separate yellow bat symbol, both sewn onto the black cape.
- Yellow Oval Base:
- Ch 15 (adjust for desired length of oval).
- R1: Sc in 2nd ch from hook, sc in next 12 ch, 3 sc in last ch. Working down other side of foundation chain: sc in next 12 ch, 2 sc in last ch. Sl st to first sc. (30 sc)
- R2: Ch 1, inc, sc in next 12 sts, inc, sc in next st, inc, sc in next 12 sts, inc, sc in next st. Sl st to first sc. (34 sc)
- R3: Ch 1, sc in first 2 sts, inc, sc in next 12 sts, inc, sc in next 2 sts, inc, sc in next 12 sts, inc, sc in next st. Sl st to first sc. (38 sc)
- Continue increasing evenly at the ends of the oval for 1-2 more rounds if you want a larger oval. FO, leaving a long tail for sewing.
- Yellow Bat Symbol:
- This part is tricky to describe precisely without a diagram. The simplest approach is to crochet a bat shape by creating a series of chains, slip stitches, and single crochets to form the outline of the bat. Alternatively, you can find a separate “crochet bat appliqué pattern” online or sketch one out. For this pattern, assume a simple silhouette.
- A basic guide:
- Ch 2. Sc in 2nd ch from hook.
- Ch 3, sl st into previous sc (first ear).
- Ch 5, sl st into same sc (inner wing section).
- Ch 7, sl st into same sc (outer wing section).
- Ch 5, sl st into same sc (inner wing section on other side).
- Ch 3, sl st into same sc (second ear).
- FO, leaving a long tail for sewing.
- Assembly of Logo:
- Carefully position the crocheted Yellow Bat Symbol onto the center of the Yellow Oval Base. Pin in place.
- Using the long tail, sew the bat symbol securely to the oval. Weave in any remaining ends.
- Attaching Logo to Cape:
- Center the finished Batman Logo appliqué on the back of the black cape. Pin securely.
- Using the long tail from the oval, sew the entire appliqué firmly onto the cape. Weave in all remaining ends.